NEXT OVFM CLUB MEETING – Tuesday April 23rd


MAKE SENSE OF THIS


Hopefully you’ve all had a chance to download the footage supplied by Sam Brown for this editing project we first announced last month and have been working away in taking these random clips and making a coherent film out of them. Admittedly, they seem like they don’t have any potential at first (Sorry Sam) but once you go through them all, I am sure you will some inspiration from at least one of the clips as a starting, just as I did.

Tonight is the night that we get to see what you have achieved for this project, and if we’ve learned anything about our club members it is that we always give any challenge a go no matter how vague the subject or source material is. We at OVFM pride ourselves in our creativity and we hope to see an example of this on Tuesday night at the screening of the films for this project.

As usual we ask a little cooperation from everyone bringing a film to the meeting to PLEASE REPLY TO THIS POST in the comments/reply section below, letting us know the film’s run time, media format (DVD, Blu-ray, USB/Memory stick), file format if using the latter (MP4, MKV, AVI, etc.) and picture ratio (4:3 or 16:9). This is a great help for us when planning the evening out and helping things run smoothly so if you could do us this courtesy it would be greatly appreciated.

Thanks for reading and we look forward to seeing your films on Tuesday!

Colour Grading

by

Lee Relph


You may recall last year John Epton held a talk on colour correction and colour grading (the video is HERE in the Members’ Only section) as an important step in the editing process. Editing suites have come a long way over the past decade or so and their colour correction facilities in particular have become much more sophisticated in what they can do for our footage yet are relatively easy to use.

Thanks to these developments it is now possible for amateur filmmakers like ourselves to create better looking clips and films and depending on the software – with an industry standard colour graded aesthetic. It can also help spruce up any old footage recorded on archaic formats like mini DV or video tape, give them a new lease of life, and not look so dated in comparison to modern digital output.

Recently I compiled and assembled a new SHOWREEL for the club for which I delved into the available archive of OVFM for snippets to use to showcase the array of films we have made over the past 60 years and the different genres. However, because much of the content was so old, the quality of the footage not only showed its age through faded colours or overexposure but also stood out against the pristine veneer of current clips shot with digital cameras.

This presented me with a challenge in trying to rectify this with a view of creating some kind of consistency across the whole presentation. If I’m being honest, this was possibly more time consuming than animating the text in the clip which in itself was a lot of trial and error! Luckily, I am currently using Adobe Premiere Pro CC 2018 as my editor which has an excellent and intuitive colour correction tool that was very much up to such a task.

Premiere Pro’s basic correction tools would have been sufficient in restoring some of the major picture elements (like contrast, exposure, highlights, saturation, etc) to something resembling their original state but a fairly recent and very handy tool to add extra depth to the colour is the LUT – Look Up Table. I don’t know if these have crossed over to other editors but a LUT is basically a preset to be added to a clip that has been set to create any kind of tone, atmosphere and colour boost to get the image you want.

Using LUTs is how we can achieve the professional looking colour grading I referred to early, by altering some of the picture’s dynamics to replicate certain looks, as well as the setting of specific cameras. These are not fixed so one can fiddle with them to suit their needs otherwise you can simply apply them to your clip and transform it immediately.

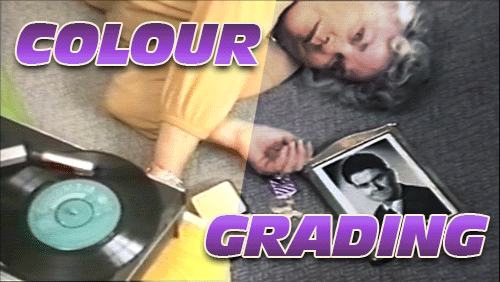
The most popular LUT among editors today is teal and orange which, as the name suggests, manipulates the blues and oranges to create a bright and vivid look and bring out some interesting hues in the process. You’ll have seen this effect used in many recent film, TV shows, and adverts which show off its flexibility. I also used it here too, as you will see in this selection of examples from the showreel of my own attempts at colour correction and grading.


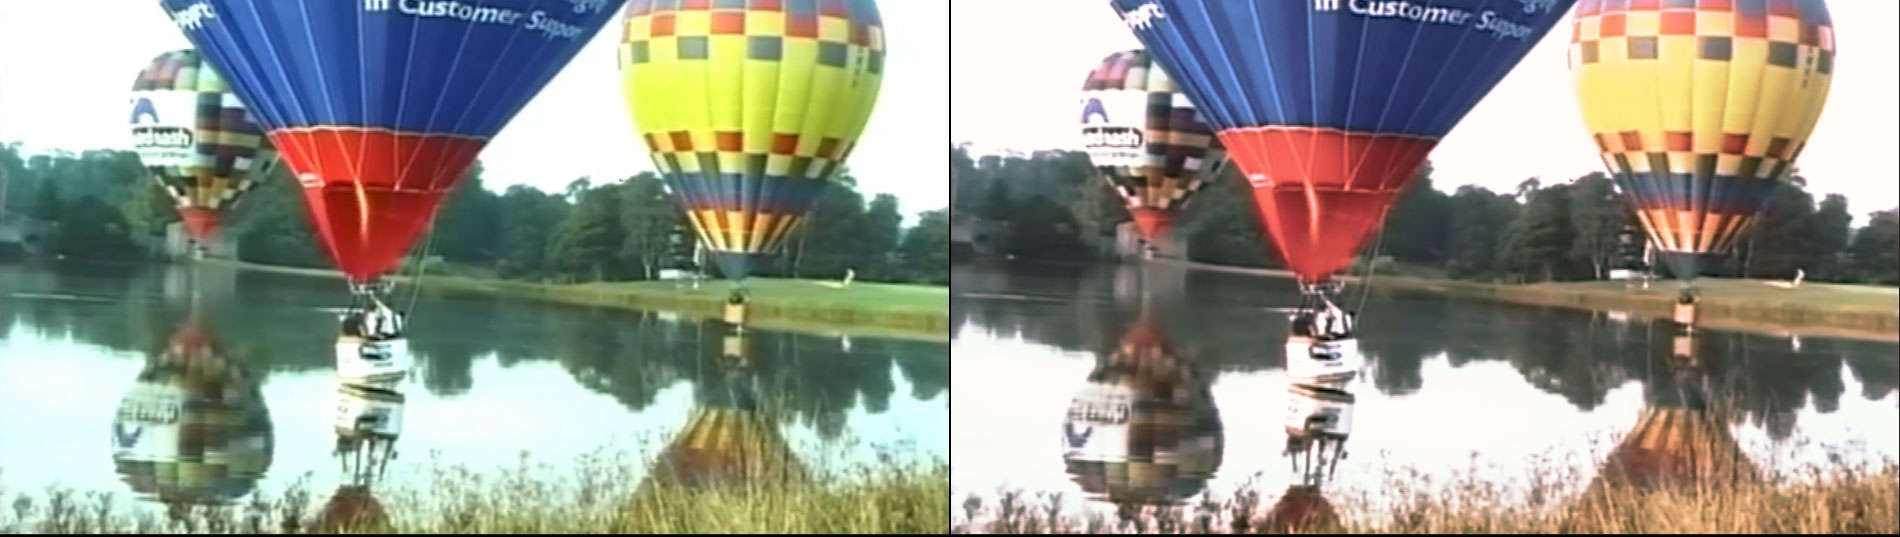
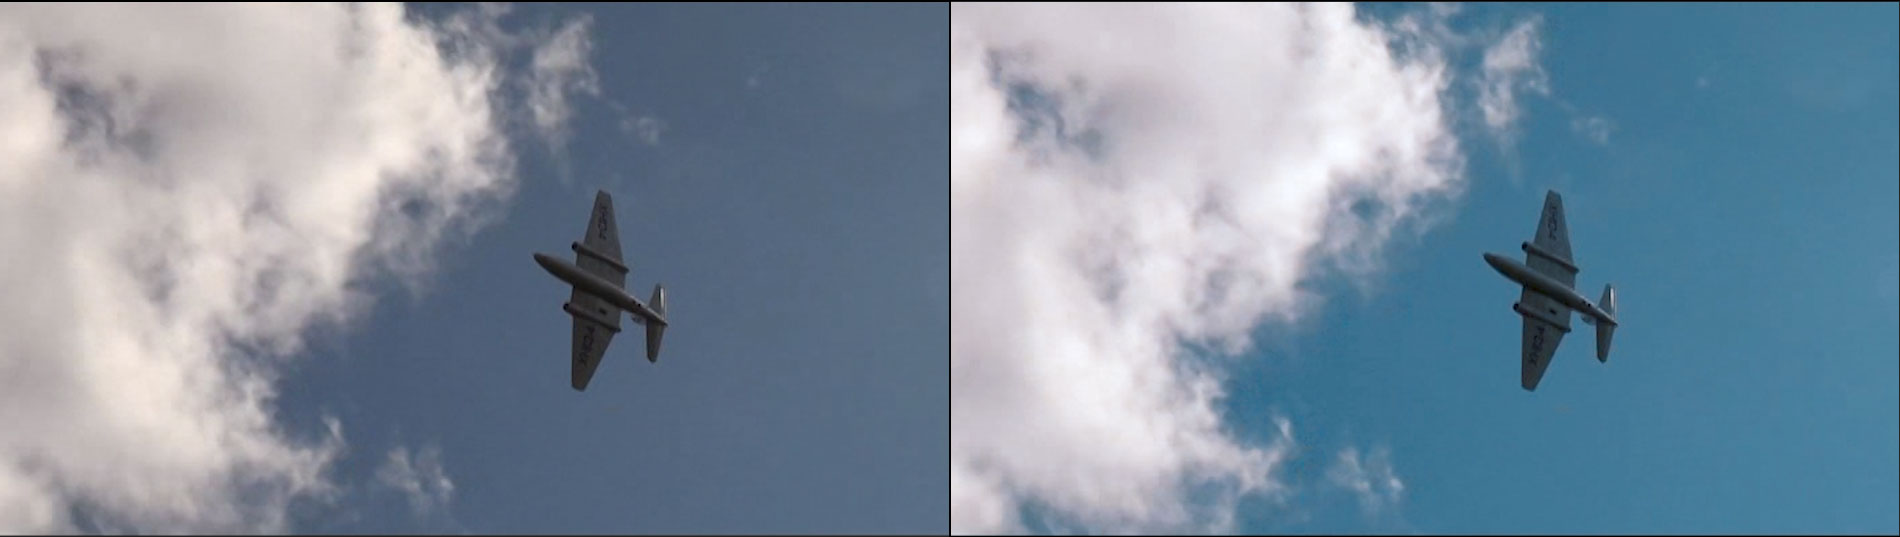
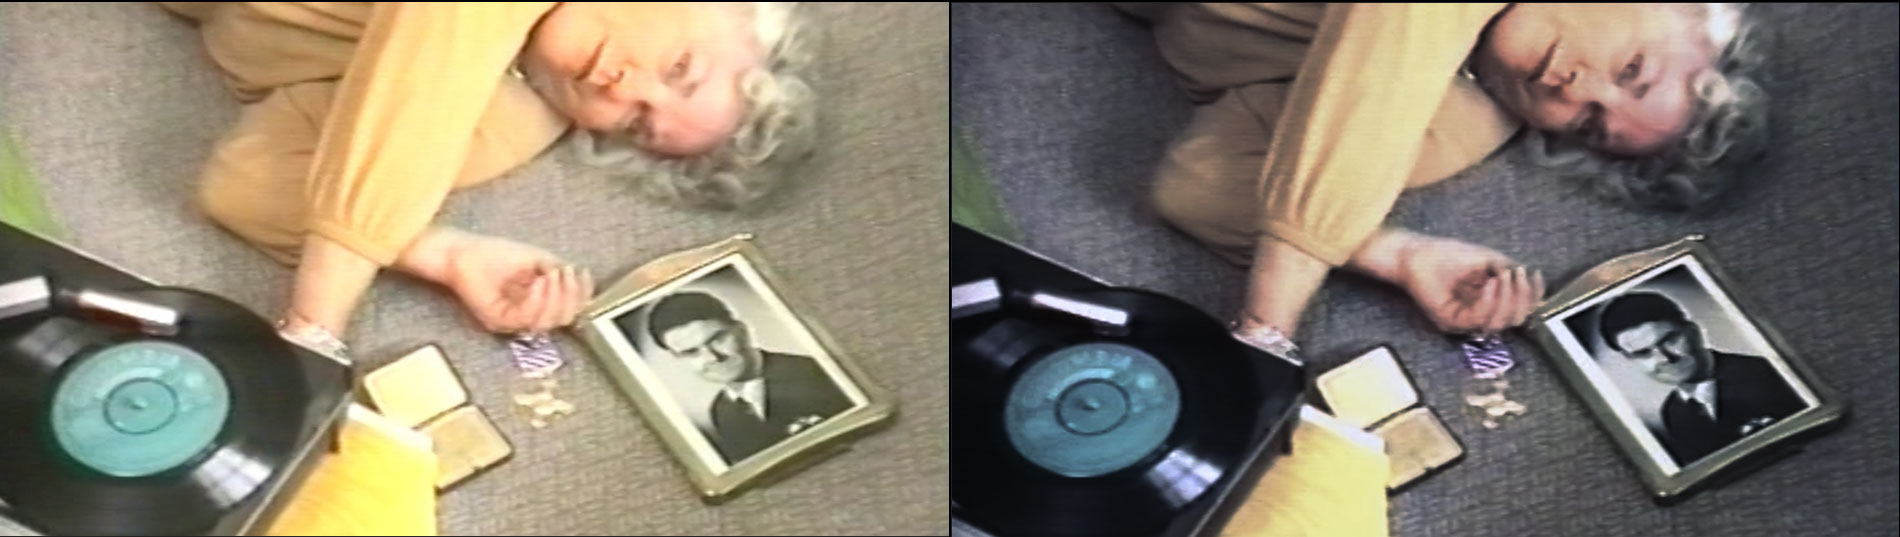
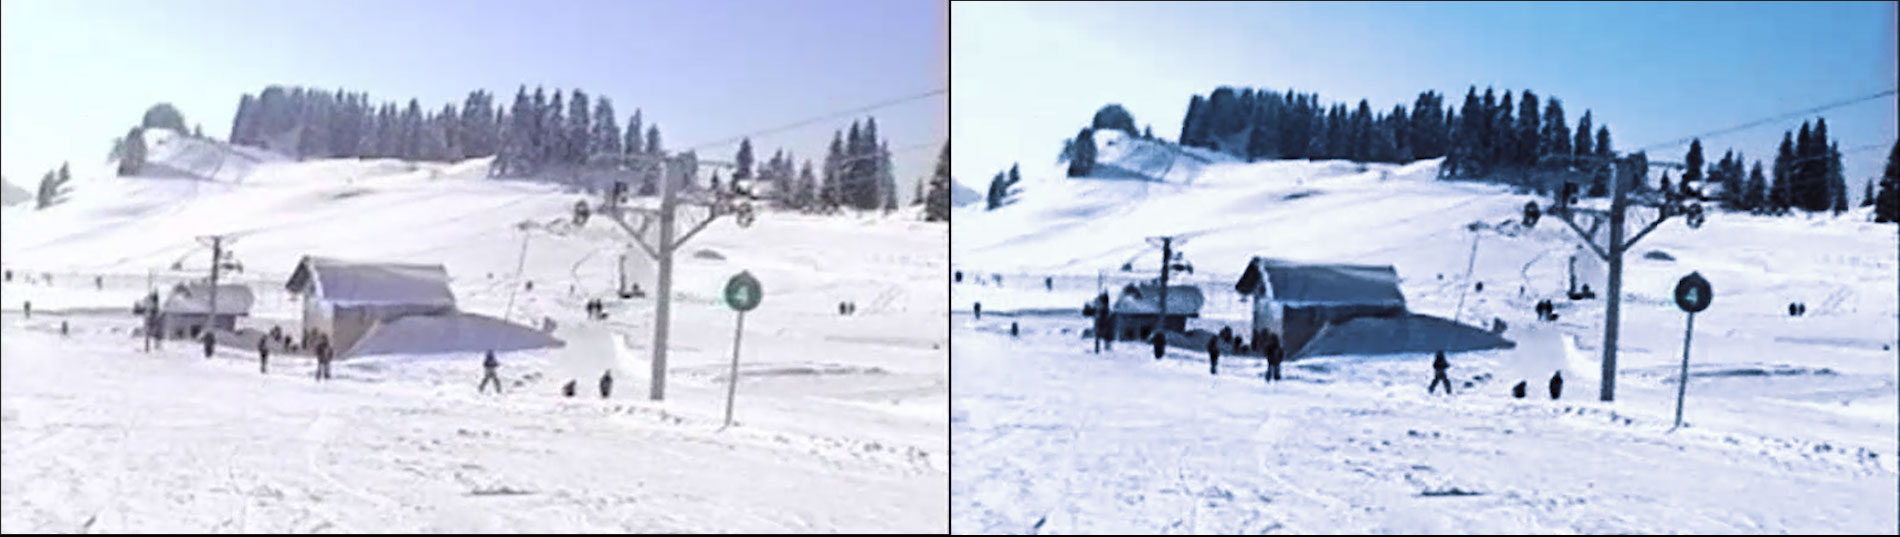
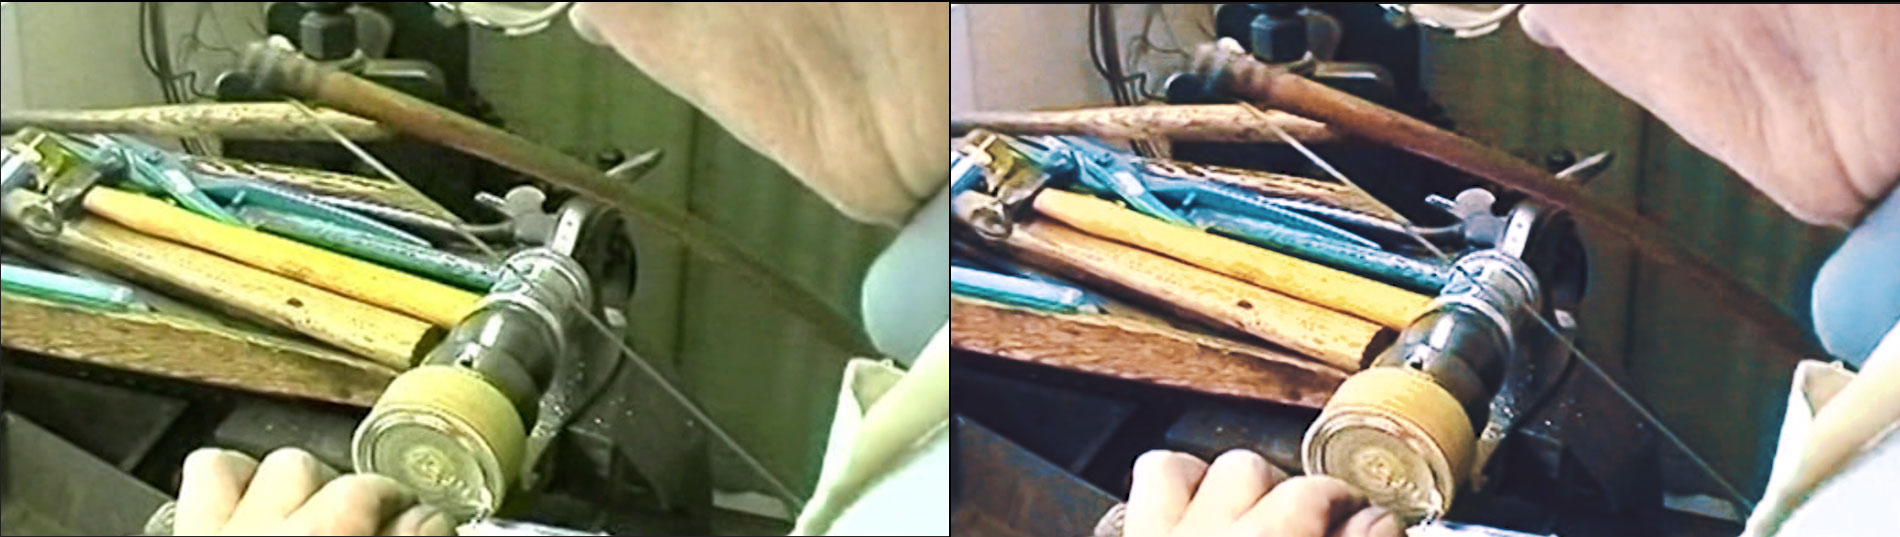
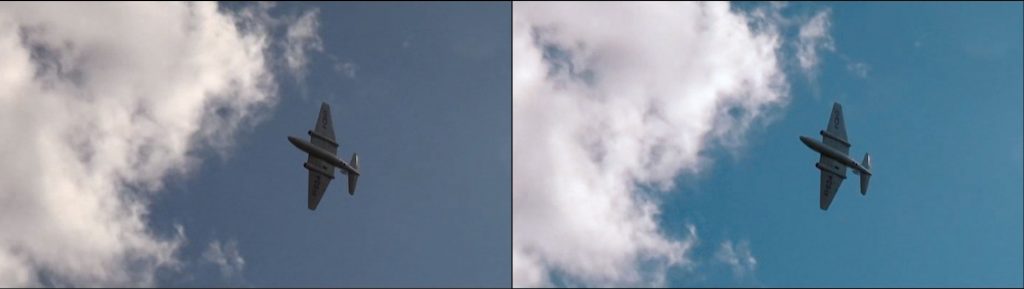
Please note the image on the left is the original untouched footage whilst the image on the right is the “corrected” version. Click the image for a large version.


As you can see in this first example the original clip is lacking in depth and definition, and the colours are rather washed out as a result of being shot in natural light on tape then later digitised, losing a lot of its lustre. By altering the basic settings then adding the teal and orange LUT with a few minor adjustments, the new version looks and feels warmer and the colours and details stand out more:


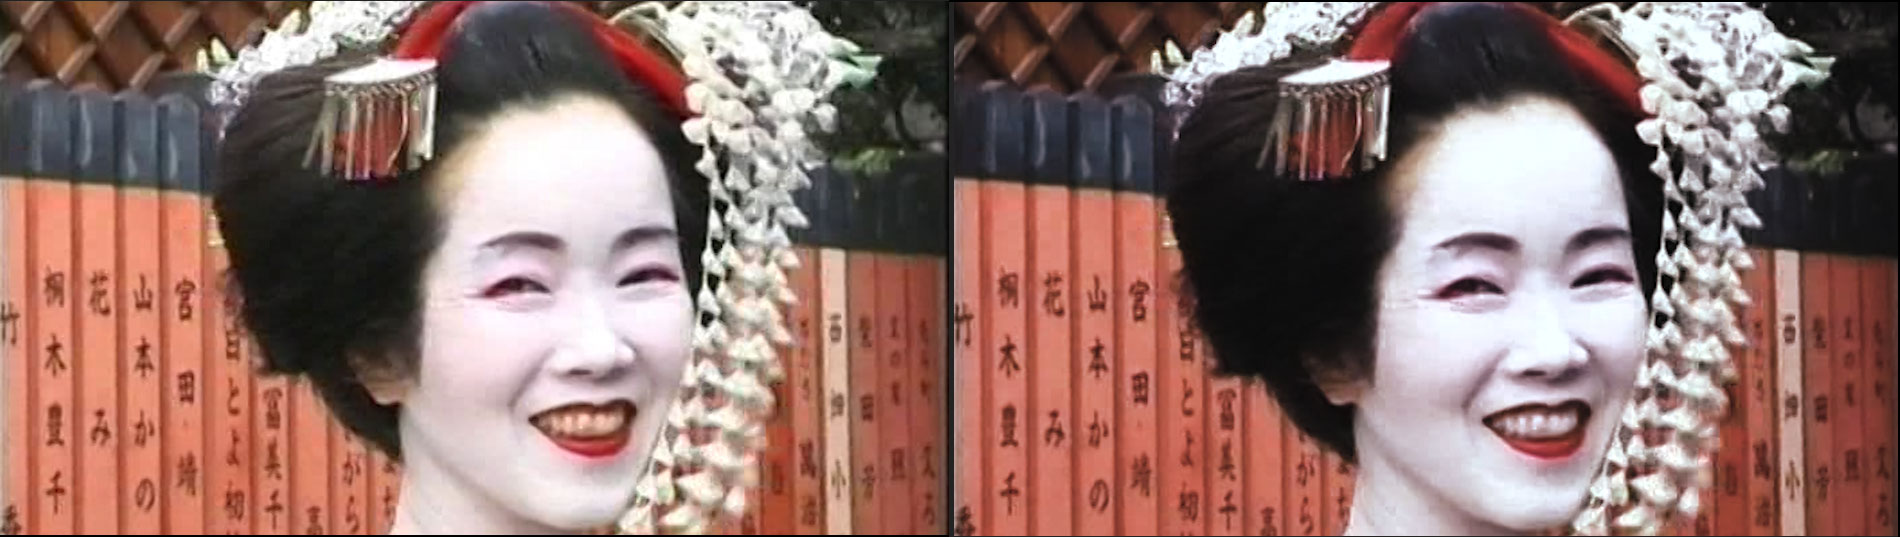
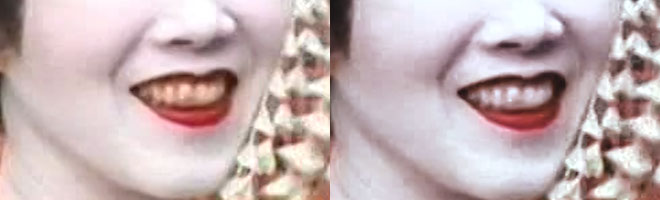
The next example isn’t perfect giving the age of the original clip but I feel it has more definition and the geisha stands out more as again, the natural light seems make everything seem flat. The teal and orange LUT also give the background a bit of a lift too:


Also note that I used an additional mask to clean up the geisha’s yellow teeth:


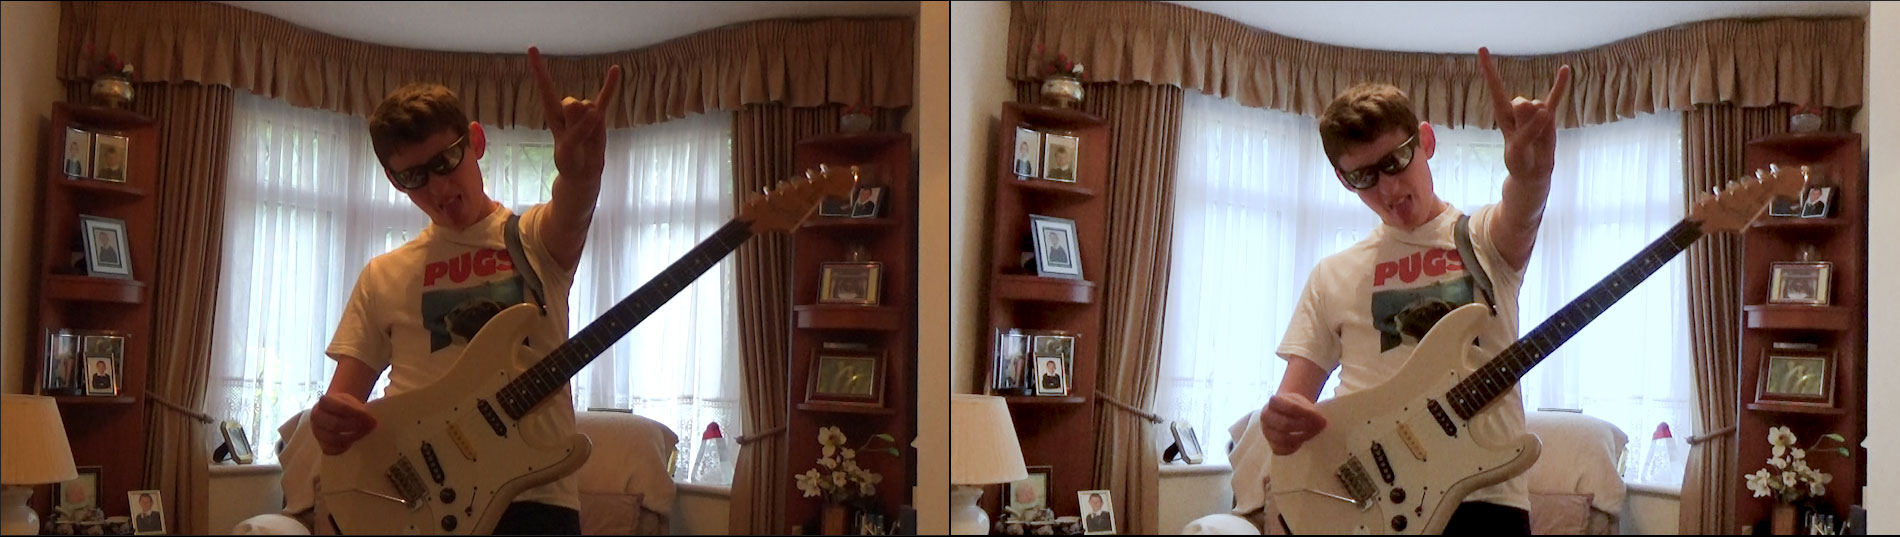
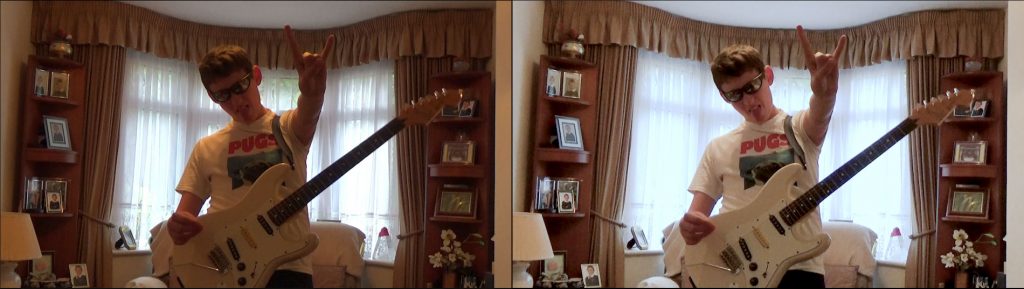
One of my own clips now to show that even digital photography doesn’t automatically guarantee perfection. This was shot with my nephew in the living room and me in the adjacent dining room, with the main overhead light in the living room coming through orange tinted bulbs and the light from outside in the background. There is a slight compromise with the glare and exposure of the background light in the second image otherwise an overall improvement nonetheless:


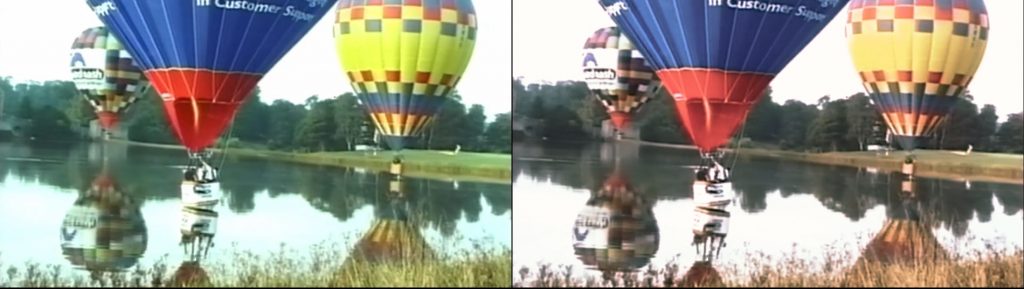
This shot of the hot air balloons was another tricky one to get right because of the varied colours involved. I believe it was also shot very early in the morning so the light wouldn’t have been at its strongest and presumably on tape. The colours might look paler in the second shot but I would venture they are closer to how they were at the time, whilst the added depth to the landscape is more natural looking too:


Here’s another recently filmed shot on a digital camera that looks okay as it is but with the orange and teal LUT the blue skies are given a nice summery boost. Even the smallest touch can yield some great results:


The next two examples are from the same film, and I’d wager were shot on video tape! The first was a nighttime scene set during the war which was very hard to work with, as the light was intermittent thus there was no stability in the brightness or colour. Again, it was more about making the colours look more natural:


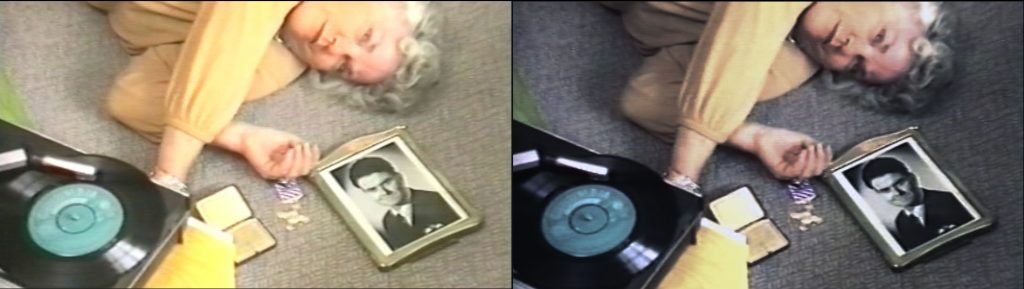
Clip number two from this film was shot indoors and whilst it looks alright, it is in fact lacking in contrast and everything is washed together by the light, perhaps a casualty of being passed through various different formats over the years. Being darker and less saturated brings out the “true” colours of the yellow jumper and the grey carpet:


Another very challenging older clip that was shot outdoors where the light reflecting off the snowy landscapes turned everything white! The orange and teal LUT gives the sky a refreshing blue tint as opposed to the pale mauve in the original to compliment the renewed sense of definition of the foreground objects:


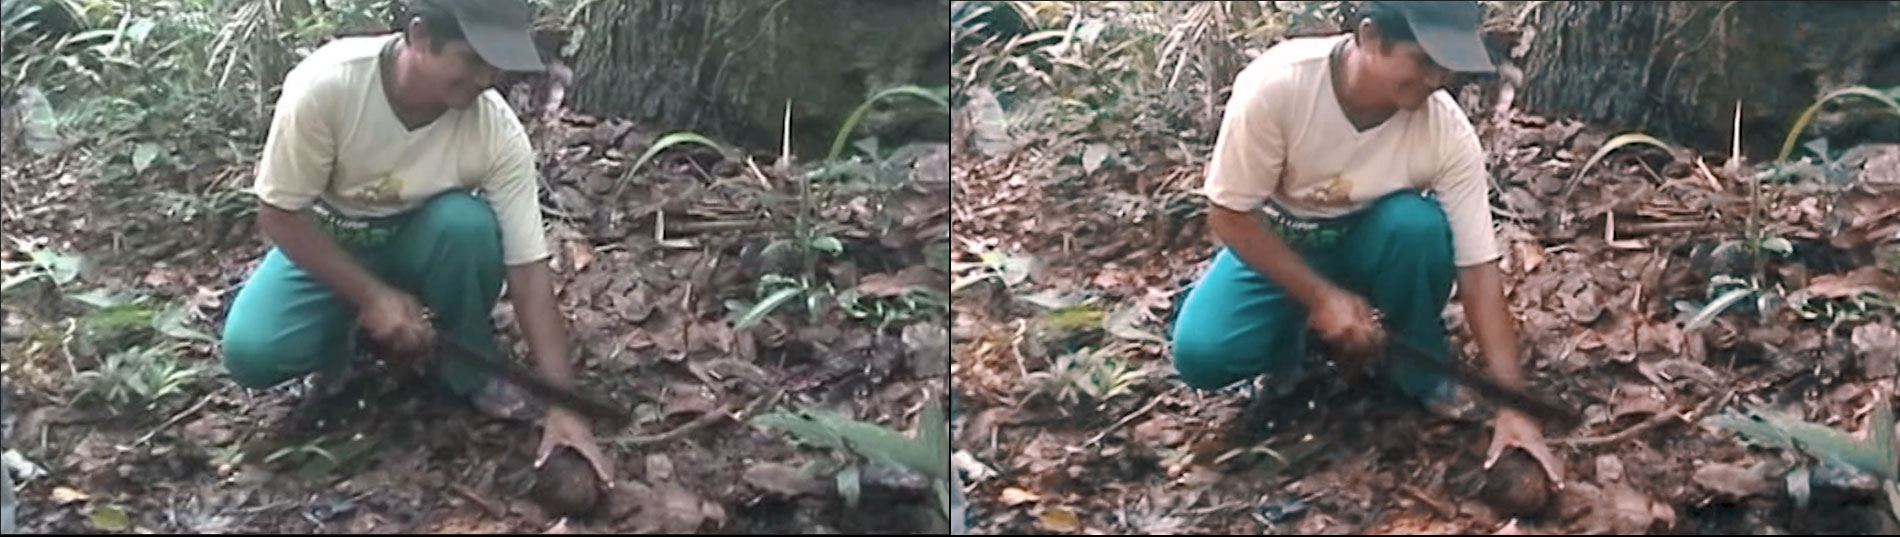
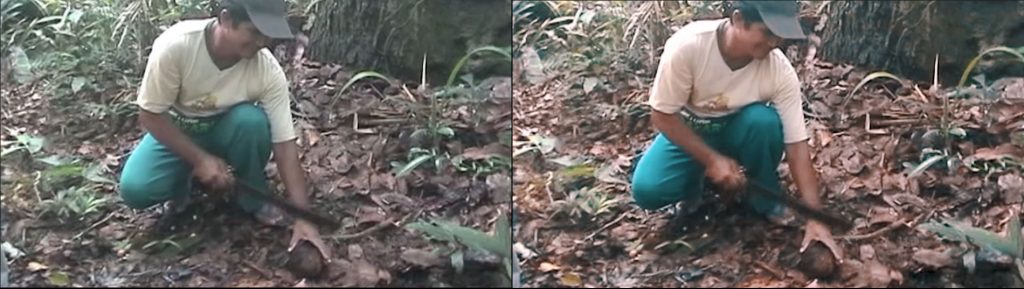
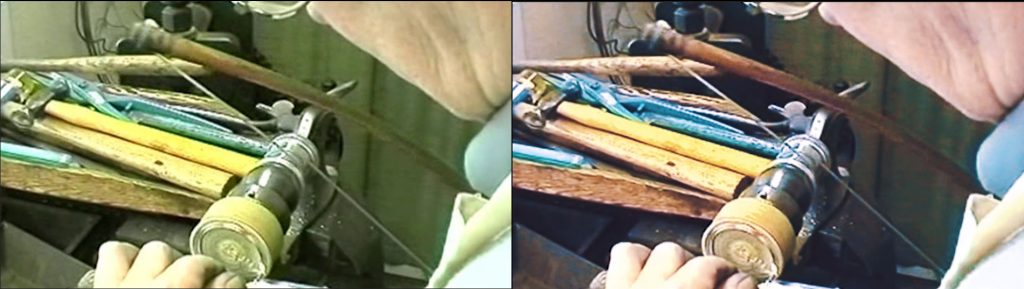
Finally, the hardest clip of them all. Like the snow in the previous example, the location of the workshop dictates the lighting of the clip along with the age of the footage and the medium it was filmed on. As you can see, everything is bathed in green robbing the individual elements of their own colours and the picture of its depth. A lot of fiddling was involved in getting the exposure and definition right whilst our favourite LUT also needed some twiddling to restore the original colours to their former glory:


Now, I’m not going to say that these are by far the most perfect examples of what colour grading can do but I learned a heck of a lot in doing this and given my lack of experience and the quality and age of the clips, I am content with the results, and I hope this has been informative for you too.

So, next time you have a clip that looks a bit off or needs some tidying up, take a look at John’s tutorial on colour correction and, if your editor allows it, get some LUTs and make your old clips or your new footage look like a million dollars! There are plenty of further tutorials online about LUTs and colour grading so look them up and give it a go yourself!


Thanks for reading.

2019 OVFM OSCARS – THE RESULTS!


THE RESULTS

The 2019 OVFM Oscars took place last night (March 19th), organised this year by Ian Menage  with help from Andy Watson with the video presentation. Two of the judges from Spring Park, Graham Evans and Roy de Boise, were in attendance to help us celebrate and reward the past year of great filmmaking for OVFM.

So without further ado, here is the list of winners as voted for by OVFM member and judged by Spring Park.


ANNUAL COMPETITION AWARDS

Ian Dunbar Cup (Best film) – An Unwelcome Piece Of Orpington’s History by David Laker

Orpington Trophy (Best Film Runner Up) – Beyond The Sunset by Sam Brown

Arthur Woolhead Trophy (Animation or Visual Effects) –  Aristotle by Hugh Darrington

Priory Trophy (Editing) – …. 104! by Ian Menage

Rene Morris Penguin Plate (Photography) – Beyond The Sunset by Sam Brown

Reg Lancaster Trophy (Funniest Film) – Aristotle by Hugh Darrington

Alice Howe Trophy (Documentary) – An Unwelcome Piece Of Orpington’s History by David Laker

Raasay Trophy (No special category) – Seasons’ Blessings by Jane Oliver

Jubilee Shield (Film under five minutes) – Sandwich Break by Hugh Darrington

Commendation Awards –

Braveheart by Jane Oliver

A 1940’s Experience by Barbara Darby

A Time When Orpington Was Still A Village by David Laker


CLUB AWARDS

The 2018 Top Ten Competition

Winner – Beyond The Sunset by Sam Brown

Runner-Up – A Time When Orpington Was Still A Village by David Laker


Kath Jones Cup (Joke Fim) – Costly Words by David Laker

Vic Treen Cup (Fim Set to Music) – Otford Remembers by Barbara Darby

Mike Turner Plate (Film Under 60 Seconds) – Mr Sandman by John Bunce


N.B – two awards were not given as the judges didn’t find any films suited to them, these being Heyfield Trophy (Sound) and Vincent Pons Shield (Fiction).

The evening also saw a special presentation to John & Ann Epton for their efforts in organising our 60th Anniversary Show at the Odeon cinema.

Congratulations to all the winners and we look forward to doing it all again next year, provided we have a volunteer to assume the role of competition’s officer as Ian has decided to step down, so thanks to him for his efforts over the past year.

OVFM CLUB MEETING TUESDAY SEPTEMBER 4TH


It’s that time again when we gather together the most esteemed of our filmmaking experts and put them in the spotlight to answer your questions about our noble pursuit.

Filmmaking isn’t an exact science since the advancements in technology and ways we can capture and share or footage and the methods in which they are edited and presented are changing constantly, so it is natural that these changes will be a mystery to those of us out of the loop. Conversely, there are those tried and tested traditional practices that will never go away so learning about them from the past masters is always a boon too.

Whether you have a query about filming, sound recording, editing, or post production techniques out panel of brainiacs should have an answer for you and maybe open up a debate on the subject if there is a difference of opinion or procedure, which should be of benefit to all of us. We do ask however that your questions are contained to the subject of filmmaking and not about computers as seems to be the way these discussions head which ends up in heated arguments over what is a subjective topic.

These sessions are designed to help and not humiliate so remember there is so such thing as a silly question – we all had to start learning from the beginning. If you don’t ask, you don’t learn.

So get your thinking caps on, or make a list if you have to, and be at the meeting on Tuesday with your questions with you where our panel will do their best to answer them for you.

FILM TO A THEME – NOTICE


FILMS SET TO MUSIC OR POETRY


It was decided by the Committee that the old “project” name be dropped and instead an new initiative take its place, hence the new title “Films’ To A Theme”. The concept is still the same, to encourage club members to make more films and challenge their creativity through  a number of regular tasks set to a fertile topic or theme.

To kick things off for this new beginning is a slight riff on an old favourite – films set to music or poetry. Unlike the Vic Treen Trophy competition held at the end of the year, the rules on this occasion are not as strict insofar as fulfilling the remit. Whilst obviously the film needs to have some sort of narrative, keeping strictly to the beat of the music isn’t a necessary requirement so you can have bit of fun with your images. And you don’t have to stick to music either – everyday sounds like bird song or traffic, construction noises or people talking and animal sounds could make up your soundtrack, the floor is yours.

Conversely, if you wish to make a literal interpretation of a popular song or create a visual narrative then that is acceptable too, which naturally applies to poems as well – in fact this would likely be a better fit. Or you could combine the too and have some gentle music to accompany your poem. The poetry can be something of your own creation or a published work, same for the music, but please take note that it is the responsibility of the individual to ensure they have the correct copyright clearances when using extant published materials.

Hopefully this will prove a challenging yet fruitful exercise for you to get your teeth into and get those creative juices flowing but here’s bad news – the date for the screening of these films is the club meeting to be held on TUESDAY MAY 29th 2018, giving you roughly four weeks to put something together.

Thanks for reading and we look forward to seeing your films on May 29th!

OVFM CLUB MEETING TUESDAY APRIL 3RD 2018


COLOUR CORRECTION/GRADING

You lucky people as Tommy Trinder used to say. We have a second Workshop evening planned for you this week to help improve your filmmaking skills.

Jim Morton-Robertson returns to the presenter’s podium, joined this time by John Epton for a session concerning an overlooked part of the post-production process for amateur filmmakers, Colour Correction/Grading.

There is a difference between the two and if you aren’t already aware of this then Jim and John will explain to us in detail what they are and how to go about applying it to you films with live demonstrations.  John already has three clips and images sent to him by club members to use in these practical showcases but the offer is still open to anyone else who has a problem clip or images that would like to see improved.

Please use the FILEZILLA service to send your clips to John or bring them with you on the night; if you choose the latter it is preferred to be on USB stick, and we ask that you please let us know by replying below so we have enough to fit your clip, otherwise if we end up with a surfeit of clips some of you will go home disappointed.

Also, ahead of the AGM on the 17th, please ensure to bring in your completed nomination forms for the committee election if you have one.

I’m sure John and Jim will be tickled pink to see plenty of keen and green faces on Tuesday for this session, so don’t leave them feeling blue or red faced by being yellow and staying away, leaving a black mark against your name!

OVFM CLUB MEETING TUESDAY MARCH 20TH 2018

EDITING


Editing. It’s one of the most important parts of filmmaking as our films won’t have a narrative without it!

It’s also one of the trickiest parts of the filmmaking process-  not to mention time consuming – but its rewards are – plentiful once the film is finished and we share it with others who are able to follow your creative vision on screen instead of looking at a slideshow of disparate images.

Heading this session are chairman/woman/person Jane Oliver and Jim Morton-Robertson who by way of a description for what is in store proffered the following:

“We’re going to examine ‘the edit sequence’ of a well known Alfred Hitchcock film, master of filmmaking, and discuss the language of editing (and as James won the trophy for the best edit this year, we thought he ought to share his secrets with the rest of us so that we may have a chance to take the award from him next year.)”

Club members are also asked to please have their nomination forms for the club committee completed ahead of the AGM next month.

And that is what we have to look forward this Tuesday evening! See you then!

OVFM CLUB MEETING – TUESDAY OCTOBER 31st

JIGSAW / CURRENT


It’s two for the price of one this week at OVFM as we share the results of our hard work in response to TWO themed projects!

The first is “Jigsaw” which was first announced back in April and hopefully you availed yourself of the two sets of jumbled up clips provided by Ian Menage, reassembled them and created a short film with your own narrative and storyline.

You had the option of trying one or both of the challenges, which were segment taken from two classic comedy shorts – “The Dare Devil” from 1923 starring Ben Turpin, in which he plays a hapless stuntman given a chance to shine by an equally hapless director; and a (spits) colourised version of “Busy Bodies”, a Laurel & Hardy talkie from 1933, in which Stan and Ollie play two accident prone carpenters.

Because of the likelihood of repetition this project will incur, we ask that you let us know by replying to this post below which of the two clips you will be bringing to the meeting (if you indeed are) – either “Ben Turpin” or “Laurel & Hardy” – so we can best allocate the screening time and try to avoid showing the same film over and over. If you fail to inform us, there might be strong chance your film may NOT be shown at all.

The second project is “Current”, ironically the more recently announced of the two. This one should provide a more varied set of contributions but again, PLEASE be sure to let us if you have a film for this project as again, too many films on the evening will leave some not being shown, and your efforts will have gone to waste.

Remember to include the following vital information in your reply:  the film’s run time, format (DVD, Blu-ray, USB stick) and picture ratio (4:3 or 16:9).

Join us on Tuesday for what looks to be a fun filled and creative evening!

NEW OVFM PROJECT – JIGSAW


It’s project time again at OVFM and this one is a little different from the usual tasks we set you.

This time you don’t have to do a single bit of filming, as this is an editing project. You will be supplied with two pieces of film where the clips have been arranged in a random order. Your task is to reassemble them into a coherent narrative with titles and music too if you wish.

With so many curious and creative minds in the club, the scope for interesting and diverse interpretations to come from such a concept is bound to be wide, and whilst the source material has yet to be disclosed, I am sure it will prove fertile enough to get our artistic juices flowing.

The deadline for this project will be a club meeting to be held on October 31st.

Meanwhile, distribution of the raw footage will be via one of three methods:


DVD

USB Stick

FileZilla


For the first two hard copy options, you can collect them from Ian Menage beginning the next club meeting on Tuesday May 2nd whilst anyone using FileZilla (be sure to follow Mike Shaw’s tutorial on how to set this programme up) can have the file sent directly to their PCs. Whichever of the three formats you prefer it is imperative that you PLEASE reply to this post below stating your preference as soon as possible, in order to ensure everyone is catered for.

Thanks for reading and we look forward to see the results on May 30th!

THE MAKING OF “MEET DEXTER” – PART THREE

OR

“NEVER WORK WITH CHILDREN, ANIMALS OR DINOSAURS!” 

Part Three:

Editing And Lessons Learned

Typically films aren’t shot in chronological order and this was no different although we did start close to the running order for the early scenes, seeing as Dexter wasn’t due to arrive until a little later. In hindsight one shot we should have done much earlier was where Dexter’s shadow looms over the parents – the reason being that by the time we came to film it, the sun had selfishly moved thus we couldn’t get the shadow to appear in the same spot the actors where previously situated in the surrounding in scenes.

When it came to the edit the sun’s movement as the day progressed also caused a problems with the colour grading in the later scenes, and the use of reflectors on set to counter this problem didn’t help either. Bearing in mind though the shoot ran for over six hours and was still very light by the time wrapped we did well to get the amount of natural sunlight we did and in the final analysis, it is only a few shots that are affected by this.

“Relax – a bit of fiddling in post and it will look like a dinosaur!”

For a couple of shots I was ambitious and used the club dolly, as I wanted the opening scene to be a single take, all movement parade of people to lead into the first scene with dialogue. We actually did this in only a few takes and John did a good in keeping the camera moving; the only minor niggle, which I didn’t spot until the edit, was that at the end of the shot we could see Andy’s gazebo, the rest of the crew all standing around in the background and the back of Olive’s house when this was meant to be a public park!

Similarly, while another dolly shot was being filmed by John and Andy, David (Laker’s) camera was filming Sue’s reaction shot at the same time – in the edit we could clearly see John and Andy in the background behind Sue with the dolly filming David and Hannah! But, as Professor Mike Shaw likes to say, this was “fixed in post”.

Editing is that strange beast in that it is rewarding and often fun but tiresome and just as likely to cause stress as the shoot itself. The first few stages are always a joy, seeing two different frames attached to one another for the first time but as the job progresses this tends to lose its lustre (perhaps I should nail it down in future), unless one pulls off a smooth cut where movement is involved maintaining the natural flow and tempo between shots.

I can’t speak for other people as I don’t do impersonations, but when I edit I tend to find the first day sees plenty of work done then the next I’m redoing what I did the day before. Perhaps this is me being a perfectionist or maybe we see things much more clearly after a break, or when I have my glasses on which also helps. This meant the edit was one of the longer ones I have undertaken through forever fixing what I had already done.

Yet I learned so much during this process, not in the least because I was using my upgraded editing software for the first time so I was learning on the job. Despite knowing what keyframes were, I had never used them before but they came in handy for a number of shots, as did many of the built in effects my software boasts, which I was previously too scared to use.

“I know a great plastic surgeon who can fix that for you!”

Also during the edit, I was inspired to add new ideas to the presentation and narrative beyond what I already had dancing about in my head and in the script. The arrival of Dexter, for instance, was more abrupt and less visually evident that this huge beast was arriving imminently. I realised I needed some kind of transition between the two shots of the parents but couldn’t figure out what.

Then I noticed when Hannah says “Meet Dexter” the bushes behind David and Sue are ruffled by a gentle breeze, reminding me of old cartoons when the ground would shake when a large monster would appear. So I located footage of the garden and applied an earthquake effect to it, along with a candid outtake of Penny (whom I was pained about cutting from the film), and voila! we have a credible transition scene to denote Dexter’s arrival I would never have thought of before!

But each filming experience is a huge learning curve and I for one can say unequivocally that has been the most educational filming experience of my meagre 6-year filmmaking career thus far, not limited to the instances outline above, and I hope that everyone else involved also took something from working on this shoot.

That said, the most important thing I learned from it was why I rarely make films!

Once again, an almighty humongous and heartfelt thanks to everyone who was involved in making MEET DEXTER and thanks for reading!

It’s Richard Burton and Elizabeth Taylor all over again….


Missed Part One? Read it HERE

Missed Part Two? Read it HERE


Words: Lee Relph

Photos: Kuldip Kuar