OVFM Club Meeting Tuesday February 18th 2014

colin


This week’s club meeting was originally going to feature a talk from a chap named Andrew Bishop who had to pull out, so we are grateful to our very own Colin “Colin” Jones for stepping up to the plate in Andrew’s place.

Colin will be discussing animation, a subject I am sure many of us will be interested in and possibly have had idea of trying ourselves. Colin’s presentation will be a mixture of anecdotes and a film show, starting from his own experiments with the medium for opening credits for his family films. Colin’s son Tim picked up the mantle of becoming the animator in the family, making stop motion animation films, a few of which Colin hopes to share with us. Finally we shall look at the collaborations between Colin and former OVFM member and professional animator Dick Horn, whose work we sampled at the last archive evening in the form of Simple Sisyphus.

I hope you can join us on Tuesday for what promises to be an entertaining and enlightening evening.

Th-th-th-th-th-th-th-th-That’s all folks!!

Scriptwriting with Celtx Pt 2

shakespeare


SCRIPTWRITING WITH CELTX

Part 2: Writing Your Script


Hello Folks


Here we go with the second part of my Celtx demo. If you missed the first part or need a refresher, you can find it HERE.


On with the lesson!


WRITING YOUR SCRIPT


Presumably you have already written a synopsis and a treatment (a scene by scene telling of the basic story) and have your characters and other essential information all worked out and added to your Screenplay catalogue (such as props, locations, cast, etc) on your Celtx project which means we are ready to go.


The first thing to remember is that Celtx works on a predictive basis, meaning it is programmed to recognise and suggest which instructions you want to use next (eg: dialogue, action, scene heading, etc). This is very handy as it saves you much time in typing out names as well as guiding through the various stages of the scripting process.


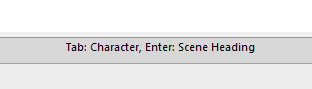
Always keep an eye at the bottom left hand corner of the workspace as this tells you what function will appear if you are to press the “Enter” key or the “TAB” key.


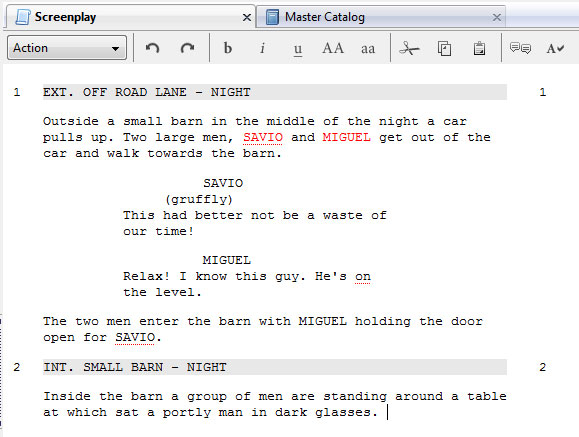
To begin you’ll notice in the top right hand corner of your workspace, the action tab should automatically be set to “Scene Heading”.


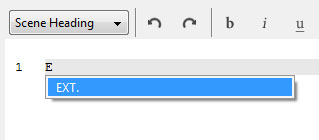
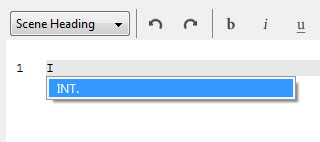
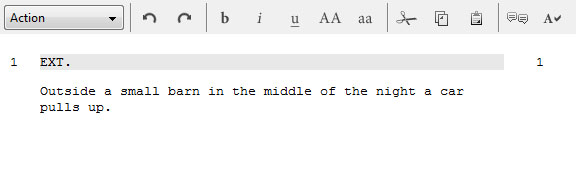
Click in the document writing space and a grey box will appear. If your story is set in the outdoors you’ll want the “Exterior” note abbreviated to “EXT.”; conversely if it is set indoors your want “Interior” or “INT.”.


Click in the grey box and type the first letter of your location and it will offer either and E for “EXT.” or an I for “INT.”


C12a

C11a


Then type your location description after it followed by a “–“ then if it is “DAY” or “NIGHT” :


C14


Hit enter and it will move to the next line. Notice the Action tab will now read “Action”. Start typing the first scene of your story.


C13a

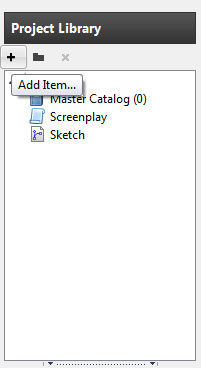
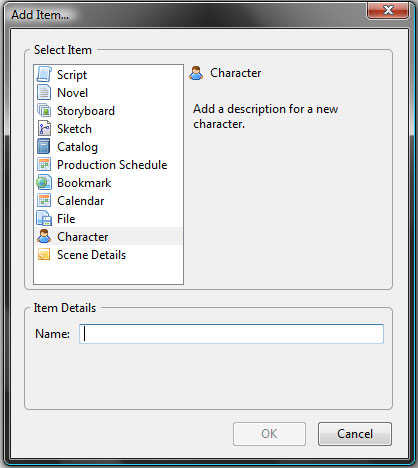
When you come to a character’s name, it is possible that you will need to highlight them then click on the “Notepad” Icon on the small box at the left hand side of the workspace, select “Character” from the list then click “Add”.


C16a


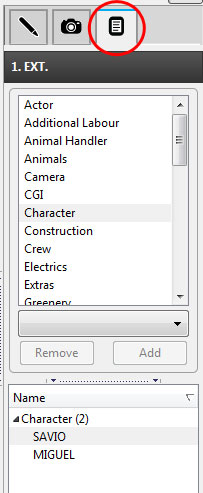
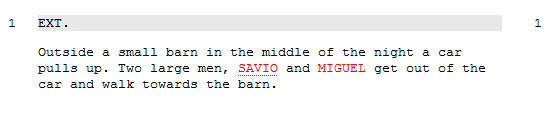
This will highlight the character’s name in red to mark their first appearance in the script and will store it for the catalogue for writing dialogue.


C15a


When you have written your passage, you will notice in the option of continuing writing or if you press “Action” you can start a new scene, or you can press “Tab” to the first stage of writing the dialogue which is “Character”.

C14a


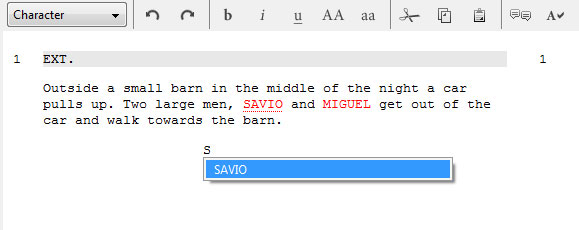
Type the first letter of the character you want and the full name will appear in a dropdown box.


C17a


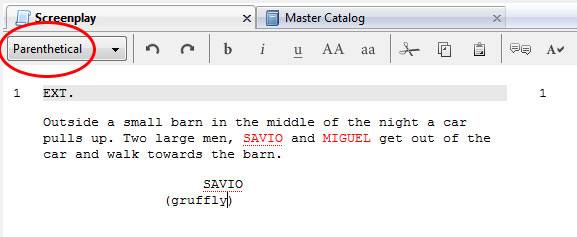
Press “Enter” and you are ready type your dialogue. If you want, you can add a parenthetical (or a “wryly” to give them their professional nickname) by pressing the TAB key once.


C18a

C19a


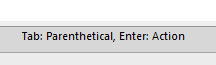
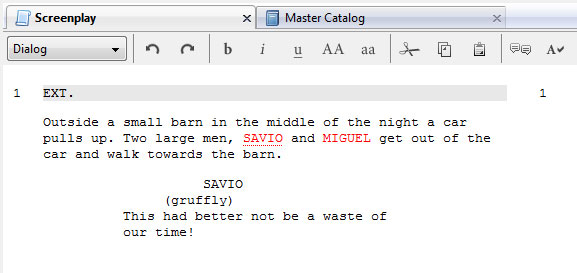
If you don’t need a “wryly” then press TAB again and it will revert back to Dialogue.:


C20a


Just continue this process to flit between action, dialogue, characters (remember the names should always be capitalised) and scene headings. Usually the Scene Heading option will appear from the “action” mode, when it believes you have come to an end of a scene. Just hit “Enter” to start a new scene and follow the previous steps.


C14a

C24a


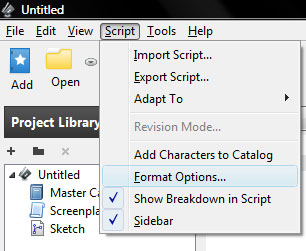
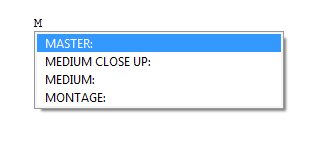
You can also add shots into your script by clicking on the action box at the top and selecting “Shots” (N.B – you will also find “transitions” and “text” options here too but I’ve not yet used them so I’ll skip them for now).


C25


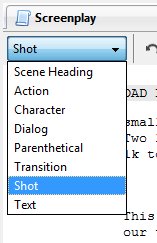
This again works on a predictive basis so all of the shots are stored so you just need to type the first letter for the options to appear:


C26


While it will take some time, you will get used to the tab/enter way of working and build up a steady rhythm which I hope you will find much easier and convenient than having to keep stopping to change idents, capitalising and typing names and other formatting nightmares.


That’s the basics for writing your script. Next time I’ll look at some of the additional features that makes Celtx has to offer to make this a more inclusive experience as well as some of the functions for an aesthetically professional looking script.


If you have any questions please reply to this thread and I or anyone else familiar with this software will try to answer them for you.


Until then, thanks for reading!

Scriptwriting with Celtx Pt 1

shakespeare


SCRIPTWRITING WITH CELTX

Part 1:  Getting Started


N.B – Celtx has changed a lot since this article was first posted. In 2016, they moved their operations to a cloud based service  to encourage online support and collaboration, as well as being able to push their subscription services since the basic version of the software was free.  However, the free version of the software is still available from external providers, with the tiny caveat of needing to run it whilst connected to the internet for the features to work.

For a beginner and the basic level we are going to be working at, what the free version provides enough to cover this. And hopefully, the software hasn’t changed *that* much that the fundamental principles outlined in these articles aren’t still relevant.


Hello Folks

Further to the recent Celtx demo I gave at the club meeting on the 12th of November, I figured that since there was a lot of information to impart at half an hour wasn’t long enough – plus my awkward presentation skills probably made it seem like a load of garbled nonsense – it would be more helpful to add a blow-by-blow guide to getting started with Celtx here on this site, for people to refer to whenever the need arises.

As before I will be concentrating to the absolute basics as there is a lot to take in and a lot of the functions available in Celtx probably won’t be used by many of us anyway.

First off you need to download Celtx – for free – from this website celtx.en.softonic.com/

DOWNLOADING CELTX

On the front page you’ll see this download button:

Once the file has downloaded, run the .exe file and Celtx will be installed on your PC.

GETTING STARTED

When you open Celtx you will see this front page with the various script options available to you:

 C6a

Obviously we will be using the “Film” template but if you ever fancy ago at writing a radio or TV show or a stage play the option is there for you. There are also demo versions of each of the options for you to peruse to see how Celtx works and what it can do for you.

Once you’ve opened the new document you need to set the format so got to “Script” in the toolbar and select “Format Options”:

 C7a

The best option is to select “A4” for paper size (as the US setting doesn’t print correctly) and you can select to have “one”, “both” or “none” of the scene numbers and dialogue numbers displayed. “Pagination” simply adds a dotted line at the bottom of every page of the script page to show you when writing where the page ends, This again is a personal option:

 C8a

Now, to save time – assuming you already have your story and characters all ready worked out, you can “add” all your characters to the catalogue at the start of the process for convenience sake.

 To do this go to the “Project Library” box on the left hand side of the screen and select “Add Item”:

C9a

Then select “Character” from this list and simply enter the name of the character(s):

 C10a

You can do this other items as well at this point if you so wish or you can add them as you go along.

Now, you are ready to begin writing your script which we will look at in the next instalment of this guide. Click HERE for that.

Until then, thanks for reading!

OVFM Club Meeting Tuesday November 12th 2013

writer

OVFM SCRIPTWRITING EVENING


Over the past couple of years our entries for the annual North vs South competition, as well as the Coaching Evenings, has seen an emergence of club members starting to write their own scripts, which is encouraging as our drama/comedy output is somewhat dwarfed in relation to holiday, documentary and sundry films that don’t rely on a scripted structure.

However – there is always a “however” – it is evident that some extra guidance is needed on the actual mechanics of scriptwriting and more importantly the formatting of the scripts to make them better looking and easier for others to understand and follow. This latter facet may not seem important on the surface but trust me, it is.

Therefore we bring you this evening dedicated to exploring the world of scriptwriting further, looking at structure, characters, dialogue, description and direction notes and answering any questions you may have. And to make matters worse, your’s truly (yes me – the world’s worst public orator) will attempt to bring you a live demonstration of the wondrous (and free) script writing tool Celtx (which I have promoted elsewhere on this site) which hopefully will enlighten you to the benefits of using this tool over MS Word and encourage you all (well, some of you) to give it ago and produce a professional looking script for your future productions.

Hope to see you all there (or not, so I don’t have to embarrass myself in front everyone)!

OVFM Club Meeting Tuesday September 17th 2013

topten2013R4

After the disappointment of just two entries in Round Three of the annual Top Ten competition we hope that now the summer holidays are effectively over that there will be a greater response for round four. We hope you’ve been busy with your cameras catching the sights and sounds of whichever glamorous locale you invaded during this traditional period of getaways and relaxation, and we look forward to seeing the fruits of your cinematic labours.

The members who have been drafted for this round are as follows:


Bob Vine

Annabelle Lancaster

Alan Smith

Jim Morton-Robertson

Sam Brown

Andy Watson

Brenda & Roger Wheatley

Pat Palmer

Brian Pfeiffer

Mike Graham


Please reply to this post if you will be providing a film at this week’s session, along with the running time, picture ratio (16:9 or 4:3) and media format (DVD, Mini DV, etc). This is a tremendous help in planning out the time allotment of the meeting.

If you don’t then have a film ready please let Brenda Wheatley know so that she can try to find someone else to fill the gap in the evening. If your film is ready early please feel free to bring it along to any Top Ten night and if there is time we will show it.

If you miss your given round you can bring your film along to a later one, but it will only be shown after those drawn for that round, if there is time.

The results from the previous rounds can be found HERE.

Good luck to everyone who enters a film!

OVFM Club Meeting Tuesday September 3rd 2013

speaker

This week’s meeting sees us handing over the reigns to someone else as we welcome a guest speaker to share their wisdom and knowledge of filmmaking.

Stepping up to the plate is Tim Jones, who will be familiar to some of the longer tenured club members as he was once one of us.

tim_jones
Tim Jones

Tim, son of Colin Jones, nephew of Thorvald Nlodvisson, the son of Gudleif, half brother of Thorgier, the priest of Ljosa water, who took to wife Thurunn, the mother of Thorkel Braggart, the slayer of Cudround the powerful, who knew Howal, son of Geernon, son of Erik from Valdalesc, son of Arval Gristlebeard, son of Harken, who killed Bjortguaard in Sochnadale in Norway over Cudreed, daughter of Thorkel Long, the son of Kettle-Trout, the half son of Harviyoun Half-troll, father of Ingbare the Brave, who with Isenbert of Gottenberg the daughter of Hangbard the Fierce, first joined OVFM when he was just a foetus and was making films before he could even walk. After graduating from nappies Tim won his first SERIAC award and became the one of the youngest members ever of the IAC to become a Fellow. Now able to walk by himself and earn his own pocket money, Tim is a senior lecturer at Christ Church College Canterbury in the Film and TV department, which is located round the back of the main building next to the dustbins.

Tim will be sharing with us memories of his time as an OVFM club member along with an illustrated talk on the origins of amateur film making. And if there is time perhaps we could encourage father and son to recreate their famous fan dance that won them second place in the “All Comers Humiliate Yourself For A Plastic Trophy Worth About 2 Pence” contest at Butlins in 1974 (narrowly beaten by Pinky the flatulent hamster).

You have been warned.

OVFM Club Meeting Tuesday April 2nd 2013

Filmmaking is not as easy as it seems as I am sure we have all found out. It’s one of those areas where one never stops learning no matter how long they have been involved in it or how much they think they know. This is something that is recognised here at OVFM hence our annual Q&A Masterclass.

For our next club meeting a panel of experts – including such knowledgeable luminaries as Cap’n Chris Coulson”, Reg “Bomber” Lancaster and Professor Mike Shaw – will be on hand to share their years of expertise and experience top answer any questions you may have that is troubling you with regard to filmmaking. Shutter speed, exposure, aperture, sound levels, HD vs SD, key framing – whatever it is you can rest assured our panel will do their very best to provide an answer for you or they will publicly sing the greatest hits of Celine Dion on the roof of St Augustine’s while dressed in tutus!!

So, if you desperately need some advice or are just genuinely curious about something that this is your opportunity to put that right. And don’t be shy in asking something that may sound simple – we all have to start somewhere and chances are you’ll be doing someone else a favour too by asking!

Hope to see you all on Tuesday night and on behalf of the panel – bring it on!! 🙂

720p or 1080i?

advice

720p or 1080i?

by

Brian Pfeiffer


Is anyone thinking of buying a new Camcorder?  As my mini-dv camcorder is showing its age I’ve been thinking about replacing it with an HD device.  So I’ve been searching the ‘net and magazines for useful information and likely models.  Obviously there are many things to consider: I’d want a view finder; an external mike socket; good optical zoom; image stabilizer etc but perhaps the most important for me is to be able to get the best quality images possible.  So I began to think about what I call the filming format.  Based on information gleaned from conversations, I had thought I should go for 1080i.

 BUT then I watched an article (http://www.petapixel.com/2012/05/09/hd-video-explained-why-720p-is-better-than-1080i/) which expounded the virtues of ‘Progressive’ as opposed to ‘Interlaced’.  This stated that 720p will give a better resolution on screen that 1080i and that 1080p is the very best and gave good explanations as to why this is so; it’s worth viewing.

So I’m leaning towards 720p or even 1080p if the cost is reasonable.  But I need to know what overheads there might be for filming in ‘Progressive’ e.g. storage requirements both in the camcorder and when the data is captured for editing.  And what impact on the editing process too?  And other things such as: Do I need HD specific SD cards for filming? or HD quality DVDs for the outputIf I record in HD can I view the edited output on a non-HD TV?

As you can see I am a more than a bit confused, so I wondered if this might be a worthwhile topic to open up for discussion one Club evening when there are 10 minutes or so to spare as perhaps others might be in a similar position.

Brian Pfeiffer

Raindance Technical Certificate 1: The Power of Lighting

Raindance Technical Certificate - The Power of Lighting

Who am I?

I’ve been a member since late last year, but that’s not a lot of time in a club that meets only bi-monthly for people to really know who I am, so here goes – about the author.

Despite first writing software in assembly language and being involved in computer graphics, both at a semi-professional level since very young I never chose to enter into these as a career. After seeing various forms of government service however, which did ultimately involve both at key levels I decided to form my own companies. Today, I still run software development, digital graphics and digital publishing companies at the same time as being lecturer up to degree level computing in Mid-Kent. From next year, I’ll also be involved in the HE Digital Media program.

I did this however, without any qualifications in these fields so in 2004 after more than thirty years in the industries (amazing what happens between eye-blinks…) I

went back to school by starting an HNC at Mid-Kent College in computing and an Access to Arts course at the University of Creative Arts. Today I teach that same computing course, hold a BSc in Computing, am a Chartered IT Professional, a PGCE (i.e. I’m qualified to teach), am in the last few months of an MA in Digital Design, and gearing up for a Doctorate in Digital Design / Digital Media in the next academic year.

So what has all of this to do with this article?

While I’ve not done much with my graphics company for years (too much work elsewhere), I covered a lot of corporate work and too many fan films to want to remember them, as well as a vast amount of CG work of a different nature that was never intended to appear on film. I decided to get back into the film world via OVFM and learning new / updating my non-CG film making knowledge by joining Raindance.

I completed my Scriptwriting Certificate with them in November last year, and started my Technical Certificate this Thursday with the aim of converting each set into their Diploma level qualifications (you can take these up-front, but I don’t have time). I’ll be taking as many of their courses as I can shoe-horn into my schedule in readiness for the Doctorate next year.

Who Are Raindance?

Some of you will be well aware of who Raindance are, some of you will know Raindance from a particular perspective, while some of you will never have heard of Raindance at all. If you want to know the nitty-gritty details, take a look at their website at www.Raindance.org, but here is a summary.

Raindance was started in 1992 by Elliot Grove, an extremely knowledgable and experienced industry professional, in order to greatly expand and improve film making in the UK (though he’s a Canadian by birth). Raindance organise the Independent Film Festival, the Independent Film Trust, as well as running the British Independent Film Awards (BIFA). It is supported by film industry professionals ranging from Chris Nolan to Mike Figgis.

What some people perhaps do not know is that Raindance, as part of their commitment to improving film production provide a wide range of film-making services as well as having a massive training commitment which has expanded from the UK to include Toronto, Montreal, Vancouver, Mumbai, New York, Budapest, Berlin and Brussels. These are the courses taken by and delivered by some of the most influential British film makers in the industry today.

Chris Nolan stored his equipment in a spare space in the Raindance offices while filming his first film in and around Soho as a student with them, while Guy Ritchie hammered out the details of the ‘Lock-Stock’ script with Elliot during his film-making course. So far I’ve attended courses directed by Elliot, Chris Thomas and the legendary Syd Field.

Today, Raindance even run a flexible, tailored MA program in film making consisting of their courses, validation by University, and resulting in the production of a film as the final project.

While I may go back and retrospectively tell of my experiences and pass on tips from the Scriptwriting Course if people are interested, this short set of articles is about the Technical Certificate. Over the next five weeks, I’ll be passing on experiences ranging from lighting (last night, the first session) to weeks dedicated to sound, DSLR film making, editing, and finally SFX.

The Power of Lighting

The first session covered the power of lighting – an interesting proposal in the Craven Street rehearsal rooms off Charing Cross as they consist of small, sub-basement cubes of white-washed walls, probably the last place that a tutor wants in the instruction of lighting techniques.

The environment consisted of a wide array of lighting types ranging from Red-Heads and Blondes, to Dedo, Kino lamps and LED arrays. A wide range of clips were also on show to demonstrate exactly how setups, concepts and genre lighting styles (e.g. Film Noir) had actually been utilised on film as they cropped up in discussion.

The big question to start off with however, was ‘why light?’ (as in the noun, not substance). That may sound like a no-brainer, but it’s actually a more complex topic today than it was years ago. In the past, film cameras needed vast amounts of light from incredibly powerful beams just to get anything appearing on the film at all. Bright natural light after all, is the whole reason why Hollywood even exists.

Today, modern video cameras need very little light to do the same job – the Ewan MacGregor / Christopher Plummer film ‘Beginners’ (for which he won an Oscar) for example, was filmed on a RED camera with no lighting setup at all – it was all done with whatever natural (i.e. non-contrived) light sources were available.

Five reasons raised their head:

  • Illumination (the obvious one),
  • to create mood and atmosphere,
  • the focusing of attention,
  • the creation of depth in what is essentially a 2D media form
  • and the enhancement of the directors vision in what is actually a highly collaborative art form (i.e the director states his vision, the DoP/L and lighting engineers arrange it, if feasible).

Other than the first, what all of the others ultimately refined as was ‘to tell the story’. If you are experienced enough and know why you are doing it, every rule in the book can be broken in order to further the story that you are trying to tell. An example of this was the final death scene in ‘The Assassination of Jesse James…’, where every camera angle switch breaks continuity so as to tell the story – the story telling is so successful, that the lighting continuity breaches are overlooked.

The Assassination of Jesse James by the coward Robert Ford (Warner Bros. 2007) – A scene which breaks lighting continuity on every camera angle, but still works to build tension.

As a side, Mike Figgis in his book on Digital Filmmaking goes into this as well – breaking down the need to even consider traditional lighting setups.

Naturally, I don’t want to simply repeat the entire session here, but here are some of things that the session raises and has you thinking about:

  • With your lighting, how much camera movement can you get (for storytelling purposes) with the same setup? This is not so much about avoiding re-lighting for a different camera angle, but more about the realities of the scene e.g. a hotel room with supposedly inflexible lighting sources, avoiding the placement of red-heads that magically generate light from what should be a solid-wall.
  • Always look not just at the lighting, but how much shadow you are generating as well. Sculpting with light is not about light intensity, but the balance between the light and shadow to create the story. A different sculpt will completely change the character of the scene and individual actors. Simply placing a lamp high, middle or low alters the apparent dominance of the character, regardless of the acting.
  • Colour is the ultimate confuser. Many pros switch their monitors into B&W so that they only see the light intensities. Colour causes the brain to lie about what it is seeing, and some film-makers, even in contemporary stories choose B&W over colour. e.g. ‘The man who wasn’t there’ was actually shot in colour due to a contractual requirement to provide a colour print to certain markets, but it was not the Coen Brothers first choice. A huge amount of experimentation was required to re-print the film correctly into B&W as even different hair colours reflect light differently – a factor which is hidden by the human eye registering the colour instead of the intensity.
  • Many genre lighting setups are deliberately unnatural and go against what may seem to be common sense and reality. Good examples include Film Noir, which deliberately aims to have most lights (and especially key lights) give hard, crisp shadows.
  • Lighting types (not equipment) tends to be regarded as falling in four groups: Natural daylight (because it changes); as opposed to Artificial Light (controllable and today essentially consisting of conventional fittings, tungsten, HMI, Fluorescent or LED); whether the light is Hard or Soft; and finally whether the light is Directed, Reflected or Bounced.
  • The main difference between all light sources (the mixing of light sources is not seen as a problem in itself) is that of colour temperature and therefore the adjustment that needs to be made to return the appearance of white as seen by the camera (i.e. the white balance) back to a human acceptable white for the conditions. In the session, as well as conventional examples, we used a combination of both Tungsten and Daylight lamps (simultaneously) to generate believable setups – setting the white balance in this case was more about deciding what was intended to be the normal time of the day according to the story. A mix of light sources is a normal and believable daily occurrence – having a day lamp giving the impression of a window on one side of the face, while tungsten light gives a different impression on the other is a situation which the human brain actually expects to see and considers normal.
  • There is still a huge hangup on aperture. Traditionally more of an issue with stills photographers and older cinematographs who are traditionally film camera users, lenses and cameras tend to be favoured with as low an f-stop as possible. While nice for a desired effect (such as the associated depth of field etc.), it’s heavily over used and irrelevant in the modern digital camera world which can perform the same tasks at ever higher f-stop ratings (again, see the ‘Beginners’ example, above). Side note: a film which breaks this mould is Citizen Kane, for which they deliberately designed new wide-angle lenses to have as great a depth of field as possible, but subsequently required vast amounts of light for even the dark film that it is.
  • Today, light metres are irrelevant and a hang over from film. The change from film to digital is not the important factor here however, but more that it is now possible to see exactly what the camera is seeing without the need to guess using a mathematical model (i.e. a camera version of WYSIWYG), then hope for the best when the film is printed.

The final part of the evening involved experimenting with a traditional 3-point lighting setup but taking it far further than the conventional use – especially with what has already been said here regarding the capabilities of digital camera.

While the important factors of the traditional 3 point setup were discussed (not repeated here, as we’ve already gone though a coaching evening on this very thing in any case), we also went into repeating the same principles to create 4, 5, 6 and more point lighting systems establishing the approaches to increase the storytelling of the background and alternative key features of the scene, as well as improve results and storytelling through the various lens apertures (e.g. lighting for the long lens etc.)

The Social Network (Columbia, 2010) – Extremely rare simultaneous two camera shoot: the key light of one subject acts as the fill and kick light of the other. An very complex lighting setup to design and implement.

Conclusions from the evening

Being principally concerned with the teaching of various software development disciplines, database design and IT management as well as still being firmly established within industry, I sometimes despair at the gulfs between what an industry actually does on an everyday basis and what academia tells a student is important. It came as no surprise last night therefore, that many an arty member of the audience, clearly just out of or still in film school was (unintentionally) shot down by Chris (or Chris, a confusing night as both experts had the same name) by simply replying, ‘nah, not important’.

Books and traditional film classes are fine, but it is very beneficial to see what is really being used, done, or indeed ignored as irrelevant in the current film-industry by a working DoP and Director.

This in itself is important as in amongst the technical awareness of the evening there were a couple of important points which carried throughout everything:

  • Plan your lighting, and ensure that you have time to plan it, but not in order to follow some technical ‘how its done’ in either setup or the equipment being used. There is no such thing as the ‘best equipment’. Plan it so that it tells the story in the film that you want to make, regardless of how you actually do it.
  • If you can’t get the lighting right for the film that you want to make, you may not need to change the story but you will need to make a different film. Don’t try to force fit something that simply isn’t going to work for the budget that you have.

The Next Session

The next session will be far more interesting for me as while I greatly enjoyed this session, a lot of the technical aspects are things that I have dealt with before and have even been covered within the OVFM evenings. After all, exactly the same principles in lighting exist in preparing a digital scene as a real one.

The next session however, is a full session dedicated wholly to film quality sound and more importantly, how to use it – something which I have never experienced in a true taught environment.


Part Two can be found HERE

Part Three can be found HERE

Part Four can be found HERE

Craig’s article on scriptwriting can be found HERE

Copyright Rules

CoolClips_cart0651


Are YOU a thief?  Do you add music to your films without permission? Do you use pictures from   other sources such as professional films, magazines or the Internet?

Then more than likely you are breaking somebody’s copyright protection, and that’s illegal!

Don’t assume that it really doesn’t matter because nobody will know about ”little me’,  because whenever our films get shown outside our home we never know who might be in the audience ready to ask questions.

Although the club has a copyright clearance licence it covers only approved club productions, individual members are not covered by this licence.

Full information about this subject can be found on the IAC (The Film and Video Institute) web site:

http://www.theiac.org.uk/