Originally written over twenty years ago, the MindSphere storyline and universe went on to be a role-playing game universe with an RPG club in South London. In 2000, a script was written with the intent of filming it, but for various reasons – not least of which was the release of a major feature film which was a little too close for comfort – nothing ever became of it and it has sat, wanting attention ever since.
Now however, with my current education coming to a close until next year, it seems an opportune time to start winding it up into motion again. You can read more about what it covers and what I’m doing with it over on The Video Players, where I’m advertising the casting and crewing opportunities, but the summary is as follows:
In the 30th century, The MindSphere Project is hopefully mankind’s answer to a serious man-made disaster which threatens to make the human race extinct. Jonethen M. (no spelling mistake, remember that things have moved on in ten centuries) returns to the MindSphere project with news which should be jubilant but instead, coupled with rumours and circumstances, results in him feeling that something sinister is on its way.
no budget as a specific exercise (more on that in the proper description, and if people ask), it will also be filmed totally digitally, on green/blue screen with digital sets (a great advantage is that my involvement with the digital arts department from next academic
year should get me access to a full greenroom), and laden with CGI (the Bruja digital locker-room set above, while not from MindSphere, came from an original MindSphere concept design). To offset budget, it will be filmed / produced over the course of two years with live-action filming expected to be in the first half of next year after pre-production and attachment of cast and crew.
And that’s what is being advertised here – cast and crew.
If anyone wants to be involved in the production, no matter how small, from DoP to microphone boom statuette, then please drop me a line (preferably through The Video Players, to try and show the actors that it’s actually for real, but no problems in any other way). I’m looking at organising a small meeting of people involved over the summer to take a look at the vision. Anyone seriously interested, I’ll pass on the current state of the script for perusal.
Ever since I started putting together videos for myself and not just for corporates, I’ve come across exactly the same problem. It’s a problem that people at every club that I’ve ever visited has also raised – whether it’s actual real-life video recording, or for use in full CG environments. That problem is one that most of you will know yourselves.
Actors.
By that I don’t mean that Actors give me a problem, but that I find it very difficult to find actors willing to participate at all. Over the last few years I’ve approached a number of sources, the most obvious being amateur dramatic societies – an obvious choice you’d imagine, seeing as both amateur film makers and amateur dramatic societies are both doing this for the love of the skill, not to make masses of money (God forbid…).
Unfortunately, the results of my attempts have tended to be far from fruitful.
When I do get replies (and this is by far the exception, I’m afraid – with most contacts actually going unanswered), I find that such societies don’t actually have a good idea of the differences between the two genres and far from looking at the approach as an opportunity to get experience in another acting discipline, there simply arises every excuse that can be imagined why not to do it. I should say that there are exceptions – one other club with which I am affiliated has connections with two drama societies, but even here the contact is tenuous with ‘rehearsals’ for a play which is produced maybe twice a year often intruding against a couple of hours of shooting.
At least one amateur dramatics society of which I am aware and nearby (to me, that is, here in Medway) is very interested in film production – only not with film makers (?). They seem to think that they can pick up a camera and do it all themselves, without any training or experience. The problem is therefore not that the two sides of the coin don’t need each other, but that the communications channels between the two need to be greatly improved.
To that end, I have started ‘The Video Players’ – a tongue in cheek code-name for a virtual troupe of volunteer players which I am gradually building. The aim is to build a pool of actors who are willing to participate in independent / amateur film making – whether it is as a hobby, to gain more experience in other areas of acting, or something separate from the society to which they belong, it’s all irrelevant. What it is important, is that as individuals they are willing to be members of a core team of actors, operating in a virtual society, and who can be approached by film makers to participate in their productions.
I’ve had a number of approaches from people on Linked In, I have had far more interest from schools and colleges where acting is taught (logical, as they want more experience for their students), but I’d like to build this further.
If you know of actors, perhaps whom you have used before, or even yourselves in an acting role, who want to be part of the troupe, then please pass on the word. We don’t need physical premises, so our ‘theatre’ is going to be a suitably formatted website where actors and film makers can get together to arrange casting calls and participate in productions – this is under development now.
I don’t want to charge fees for membership – the point is that the whole thing should be seen as a mutual service, with payment being made in kind etc.
So please, spread the word!
Until the website is ready, please use my college email address (the place where a lot of interest is being seen from the media departments): craig.robinson@midkent.ac.uk
The Power of Editing proved to be a strange session in that it was so far the most accurate in regards to keeping exactly on time, while at the same time providing so much information that I used a huge number of pages in my note-book – hence the longer time taken to write a coherent article.
Unfortunately, the session was also very ‘must see’ – watching film and editing techniques within Final Cut Pro 7. This article may therefore be the most wordy and have the least imagery of the Technical Certificate sequence.
Editing
It has been said that Editing is the equivalent of brainwashing – indeed, the three key aspects of ‘brainwashing’ are all present in the intense sessions that are required of the professional editor. To give one example only, Gabriella Enis, our tutor of the evening recently finished a ten minute ‘makeover’ documentary for the BBC. To this professional standard, she completed this ‘rush job’ in 3 days.
What this means is that she spent three days going over the same footage over and over again, hearing and watching the same events to come up with a single piece of work only 10 minutes in length. And this was a ‘normal’ piece, without such things are colour grading or any effects.
How the editor performs their task is down to the tools and the training, In regards to what the purpose of an editor actually is, this can be summarised in a commonly used analogy: there are three story tellers in the production of a film – the screen writer, the director and the editor. At each stage of production, the entire feel, emotion and focus of the story can change entirely.
Depending upon the nature of the production (drama and documentaries can be very different for example), the screenwriter, director and editor can work very closely together in an extremely intimate relationship for extremely long periods of time in order to piece together the final production.
There are essentially two different types of editor:
Offline Editor
The offline editor is the job which Gabriella principally performs, and in most ways is similar to the work which any of us would do on our own films at independent levels. We all have an editing suite in our homes (some of us essentially in the form of editing software, while others like Gabriella with far more complete editing rooms). The offline editor typically works with lower resolution data in order to make the editing process workable (as in speed of CPU processing etc.) and will probably perform the majority of the structure and story editing.
Online Editor
The online editor usually works in an in-house editing suit and will receive the work from the offline editor in order to ‘conform’ it. This process usually involves swapping out the normal resolution sequences for their broadcast / projection level equivalents.
In many ways, the difference between the two can also (though this is not a strict distinction) also involve the difference between using an NLE (non-linear editor) and a linear editor. While the latter is not really used so much any more, the conforming process can essentially be a start-to-finish process (i.e. linear). This is almost never the real case however, as it is usually the in-house online editor who will also add titles, credits, some effects etc.
It should be noted that in this case, the term ‘online editor’ is not connected with a program, or real-time editor of a television show – sometimes these are also referred to as ‘online editors’.
This division also took place in the older days of purely film-based editing – in the case of the confirmation process, this resulted in the work being re-done using a clean original negative rather than the lower quality prints delivered to the offline editor.
Today, there are really only three applications available on the open retail market which are looked at seriously from the point of view of film editing (i.e. for feature presentations): Avid, Adobe Premier and Final Cut Pro. Naturally there are many, many more but they are not used at this level of professional work.
It should be noted that with the advent of version 10 (FCPX), Final Cut Pro may also soon be dropping out of this elite list due to a wide range of professional functionality being removed from the product. It was certainly the view of Gabriella, most of the tutors whom I have had in this particular course and (from rumour) Walter Murch (the definitive editing legend, editor on Apocalypse Now, and the man credited with introducing digital editors, in the form of Final Cut Pro, into the film industry) that Final Cut Pro has now fallen into the realm of the Prosumer market-place and no longer has a place in the film industry.
Gabriella did all of her demonstrations using Final Cut Pro 7, mainly because of changes to the FCPX visual interface meaning it is actually more beneficial to see things happening in FCP7 in this case, not specifically the reduction in functionality.
Whether Avid, Final Cut, Premier or (for comparison), the outsider Blender NLE, all work on very similar principles of operation.
Workflow
The editing workflow (from a generic perspective, see later for two specific examples) takes place in four phases.
Ingestion
This phase has had its name changed frequently over the years. Up until recently, it was also known as ‘digitisation’ due to film being transferred to a digital medium but is now no longer a common process. The generic ‘Ingestion’ term is therefore used to represent the addition of all of the tapes, files etc. into a project in the software of choice. This process also involves the correct naming of all tapes and files being included, the addition of descriptions etc, to librarian standards, in order to find clips at a later stage. If available, ingested sequences are usually named after the clapper-board / slate information provided by the AD (assistant director), or at the very least the time-code of the tapes.
Assembly
The assembly phase is the creation of a raw, ‘un-edited’ sequence using a ‘best-option’ take from each of the ingested shots (see below for the different ways that this is done in different circumstances). A very rough gauge from Gabriella was that an assembly might be three times the length of the intended final production (e.g. 3hrs long for a final 1hr production). In many ways, the assembly is also pretty ‘dead’ if watched as a film as no effort has actually been made to construct the structure or story of the final piece.
Rough Cut
The rough cut phase is where the editor works on the structure of the production – making editing decisions from the assembly in order to create a structure and tell a story in a rough form. The rough cut may take a 3hr assembly down to 1.5 / 2hrs in length, but still far longer than the intended final production. It is this stage in which an actual target date is in use and may be of high pressure – it is the rough cut which is usually used, and on a pre-planned date, for demonstration to the commissioner / budget provider of the production. It is therefore vital that while not completed, the rough cut tells the story correctly and is essentially in its final, if not quality form.
Final Cut
In this phase, the editor no longer needs to work on structure and instead concentrates on tightening the story, selecting better shots (e.g. from multiple takes) to improve the quality. It is at this stage where the editor and director may spend hours deciding whether to cut a scene on frame 24 or 25 (it can be that specific).
The rough and final cut processes may often merge together. It is also in these phases where colour grading may take place (grading can be done for regularisation between shots, but also to modify the emotion of a particular shot).
It is in these final two phases where a demonstration of editing was actually performed in class, but for which it would be impossible to demonstrate adequately in this article. From here on, I’ll try to cover some of the important points in a heavily summarised form in four specific subject areas.
Editors (or Marked) Script
An editor involved in the production of drama will typically be involved in the production right from the very start, and will therefore have access to the original script (see more, below). Of far more importance in the traditional editing experience however, is the ‘marked script’ which takes the form of the original script with amendments made in a specific notation by the AD (assistant director) or other appropriate crew member such as continuity.
These notations are intended to assist the editor in indicating where, when and how certain types of filming have been performed by the director / DoP, along with information regarding how shots have been marked and how many available takes there are (there may have been many more takes, but the specified number indicates the number of good takes that were ‘printed’ for use).
Note that shots should always be filmed ‘overlapping’ – in other words, the entire sequence of actions by the actors is captured by different cameras in a repeat of the entire scene so that there is a plethora of material to work with in the editing suite. An unnamed film worked on by Gabriella as an assistant (the first feature film to come out of Zimbabwe) is a good example of a bad, non-overlapped film – the director would call cut in the middle of scene, move the cameras and lights while the actors are frozen, then restart the action from the new filming locations! If nothing else, this means that there is only ever one take available during editing.
A script marked by the AD, showing various shots and takes.
The code written into the ellipse refers to the shooting script scene number (e.g. 133), the camera setup (e.g. multi-camera or multi-setup shoots – camera A, B, C etc.) followed by the number of available takes after the slash.
The line and stop mark at the base indicates the portion of the script which is covered by the shot. Shot 134A/1 in the illustration only covers one short portion of spoken dialog and is probably therefore a closeup. In the case of 135A/3 however, this indicates a shot covering the entire scene and includes all of the dialog – it is probably therefore, indicative of the ‘master shot’ (see later, in the section on a classic dialog edit for an explanation).
The wavy line through shot 137A/4 indicates that while this scene covers all three sequences of spoken dialog, the first sequence of dialog is off camera.
Editing Documentaries
Documentary editing usually involves masses of film, but where very little is actually used in the final production. An example from Gabriella’s 10min school make-over documentary for the BBC involved a worker being filmed in the room – she had hundreds of these shots, and this particular one was about an hour long. In the end, she used about 2.5 seconds of this sequence.
A common approach to documentary production is to create a raw ingestion production (see last section) and burn the time-code into the image (if available). This raw work is then handed to the transcriber and possibly to the director (who may not actually be involved with much of the editing in this case, especially if they are a series director, as in the case of the 10min documentaries described above).
The transcriber will return a typed transcript of all activity, scene descriptions (in the case of non-interview related shots), potentially in a marked form with interesting or notable time-code ranges which should be included in the story. This transcription, created after the ingestion but before a true assembly of the raw shots effectively becomes a script from which the editor can work, and is used as a guide in telling the story that the transcriber / director wants to tell.
The story is built initially by assembling the dialogues, interviews etc. according to the story that the director wants to tell.
The ‘B roll’ is now assembled – the non-interview shots, and not just the best shots as some bad sequences may include ‘gems’ which highlight a particular point (Gabriella stated that shots of shy, inexperienced children particular fall into this category, as a single statement can make the entire shot).
The B Roll is used as source material to feed into the bland dialogue / interview assembly to illustrate what the speaker is saying.
At the point where an assembly is completed and the editor is moving onto the Rough Cut / Final Cut phases, it is always good to edit to a music track – by this time, the editor / director should have been able to select an appropriate sound track for the documentary. The music because a percussion sequence which aids greatly in established what sequences should be put / edited together.
It is very common to assemble images and sounds from different sequences – especially in interviews, where an interviewee may not be particularly cinematic. In this case (and actually the norm), keep sound and cut the images from illustrative sequences.
Conversely, in documentary editing it is often a case that reshoots are impossible and the editor must work with what they have – if there are no illustrative shots available, use the interviewee.
It should be the case the director can provide a ‘paper cut’ which the editor can use as a guide in the rough and fine cut phases. In the modern world, this is usually impossible and the director may not even have time to watch the cuts with the editor – a common process today is to hand over a transcript, then return after the first rough-cut is available, with little other creative input to the sequence assembly.
If the documentary does not totally make sense, this is usually not the fault of the editor – in documentary editing, all of the filming has already taken place and if there is not enough, there is not enough. In these situations, the documentary can often be saved with VO (voice over).
Editing Drama
In drama editing, the editor is usually involved in the production process from the beginning and may have lengthy discussions with the director regarding what and how some things should be filmed in order to give the editor enough material to work with. The editor is usually working during the production process as well, with daily rushes being delivered to the editor for ingestion / assembly – the director may also be involved over-night when filming is not taking place.
The decisions of the editor / director in these situations may result in additional material being filmed to plug holes in what has been made available or otherwise to enable the same story to be told in a slightly different manner – this is in total contrast to what is delivered in a documentary environment.
The editor may need to be a diplomat and act as a buffer between the director and producer in the editing environment, suggesting solutions to problems. At the end of the day however, it is the directors film and the editor may need to accept the [sometimes incorrect / bad] cut that the director finally chose to use.
The editor should also expect however, for the director to return to the editor to have the sequence recut as the editor originally suggested after other people have seen it – this is usually a mark of a good director who is willing to accept when they are wrong. Bad / arrogant directors who stay with the bad cut regardless, usually see their film failing or getting bad reviews.
A common description of the long periods of time that the editor and director spend in getting the film right is that they are ‘dreaming together’.
If the final edit does not 100% match the script, don’t be too concerned. The editor can only work with what they are given, but even very slight differences (i.e. cutting on frames only a couple of frames apart, or a slight difference in colour grading) can change the feeling and emotion of the film.
A typical scene should include a master shot of all of the action, characters, dialog being spoken, dirty and close ups of characters.
Initially, straight cut all scenes based on dialogue to ensure that the correct story is being told – don’t be too concerned about the images in these sequences.
Finally, change straight cuts to L / split cuts with overlapping sound / images / ambience from different tracks in order to create the emotions and feelings – the main contributor to any single emotion may be best achieved with sounds from one track, but images from another, along with totally manufactured additional information (foley and effects).
Classic Drama Dialog Scene
A classic dialog scene will include three different types of shot. The master shot is taken from a distance capable of taking in the entire scene, all principle actors and can capture all of the dialog. There will also be both ‘dirty’ and ‘clean’ close-ups of each character. There may also of course, be additional types of shot at the discretion of the director, but these are the classic components.
The distinction between ‘dirty’ and ‘clean’ closeup comes in the form of other characters or objects in the scene. The ‘dirty’ closeup describes the traditional over-the-shoulder shot in which a second, non-speaking character is used as context and shows where the speaking actor is addressing (obeying all of the ‘don’t cross the line’ rules). The ‘clean’ closeup however, removes the second character – the shot only shows the speaking character and nothing more.
Combinations of these different shots are assembled with the following considerations:
On the first cut (even if not the rough cut), use straight cuts (sound and images cut at exact same place) and concentrate on editing based upon the dialogue, not the images, so as to tell the story.
It is very easy to have a character enter frame from one shot, and complete the motion from the opposite side of the frame in the next shot (e.g. switching from master to closeup). While not quite caused by the ‘crossing the line’ error, it does make the observers eye jump and should therefore be avoided – if avoidable in the filming location, it is usually regarded as a mistake on the directors part (this is sometimes referred to as a Jump Cut).
Use the master shot not only to set the scene, but also as filler to join together two cut shots which might cause the above mistake (e.g. A rear shot shows a character slipping into a booth towards the right, but the closeup from the other character’s perspective shows the action completed while entering in from the left – instead, cut the two shots shorter and show the entire act of sitting from the master shot’s perspective, re-entering the closeup with the character already sitting in place).
In isolation, each of the shots will nearly always have a lot of space between events. The edited sequence will normally be shortened drastically (except for story telling pauses) by tight cutting between shots, removing dead space (contracting time).
Edits are far more noticeable if the cut takes place when characters are not doing anything – always cut (if possible) with the character in motion (however slight).
Once the scene is being refined, use L or split cuts (where the sound and image are cut in different places, with sound / images from different shots overlapping) to show the spoken word of one character and the reaction of the other (e.g. aggression from one character is usually best reflected in the face / eyes reaction of another character rather than the one speaking). This is particularly important if a character has their eyes hidden (e.g. they are wearing a hat, with shadow) – the eyes show the emotion.
Use the clean closeups after the pay-off of the scene has taken place, the dirty closeups before. The clean closeups allow the observer to concentrate fully on the character speaking and now needs no additional contextual setting.
Conclusions from the evening
This session was a little like a driving lesson – so many youngsters pass their driving test and think that they know how to drive, when in actual fact all it proves is that they have a basic knowledge of how to control a car: driving is something else entirely.
Nearly everyone at club level has used an editor at some point, and may know their program of choice intimately. This session however, demonstrated clearly that knowing why certain cuts are made in certain ways is far more complex and ultimately rewarding in a final quality production than simply knowing how to use the tools in the software.
Next session
The next session will be by far the longest, and yet may be the most problematic to both note and write a coherent article – The Power of Special Effects, a very practical session delivered by a S/VFX specialist from films such as Batman Begins, Sunshine and the Human Centipede films.
I’m going to stop saying how great each of these evenings was as it’s starting to get repetitive. I’ve never been on a bad Raindance session so far, so I think that we can take it as read (or, is that RED?) that it’s going to be a good one, regardless.
This session, Rory (the course organiser) had to race around at short notice to find a replacement for our planned instructor – as Rory put it, the problem with specifically using people who work in the industry, is that occasionally they actually work in the industry. Our scheduled instructor therefore, was winging his way to Egypt for 5 months of filming.
The replacement however, came in the form of David M. Reynolds and Evie Hazelton, from The Underwater Realm, who oddly enough had just returned from Egypt, working on their underwater project. As well as the session however, I’d also recommend visiting their Underwater Realm website and their vimeo account, where they have some excellent tutorials, as well as their friend Philip Bloom‘s website and blog. If anyone gets movieScope magazine, it’s these guys who are this month’s cover story (Evie herself being the cover image).
I’d also recommend taking a look at this short interview with David regarding their 50min. long feature Zomblies, and taking a look at the film itself – accessible in it’s entirety through the link, to show what can be achieved with a £10,000 budget. Not only does it show what can be done from a cinematography perspective with this type of budget, but also with the SFX / VFX. This discussion on Realm’s Pepsi advert is also a useful watch, especially if you are considering DSLR as a medium.
Before we start, there are many things in this article which are relevant to DSLR’s as well as other digital cameras (e.g. some of the technical / equipment considerations), but also cinematography tips from experienced industry professionals – especially the comments made on lighting and 3D enhancement. Despite this, this article is again not going to do the session justice – there was simply far too much information to even try to write a true representation of everything we learned.
A pinch of salt…
Most of the evening was from the point of view of Canon DSLRs – in particular 5D and 7D variants, the ‘biggies’ in regards to using DSLR cameras for film-making. In fact, David himself while stating use what is best for your own film-making, stated that he would only ever recommend Canon – not so much because of ‘Canon quality’ etc., but mainly because of the commonality of use and therefore the lower cost of additional specialised accessories (though I’ve not had this problem, with a vast array of generics being available).
Typical DSLR format: The Canon 5D – in this case in a DSLR tripod rig with a rear Loupe.
Many of the criticisms of DSLR cameras in the session however, ranging from physical to image and sound aspects, seem to be issues known to exist with Canon which I myself (with a Sony Alpha camera) don’t seem to have (I should say, I’m not biased – my choice of Sony this time, goes along side a wide range of existing Canon EOS stills camera and equipment still in my inventory).
In that respect therefore, some of the pro’s and con’s, as when discussing all pieces of hardware, are sometimes very specific to the hardware actually in use.
Why a DSLR rather than a video camera?
Two main reasons were discussed as the primary ascendancy triggers of the DSLR in film making. The first is simply cost – I say simply, though it’s more a case of cost for what you get. Up until a certain point, there was no reason to buy a DSLR for film making at all.
The point at which video camera manufacturers became concerned however, was when the new range of very large sensors entered the market place, giving better image quality and angle for in some cases one-tenth of the cost. Couple this with the other benefits of DSLR cameras, not least of which is the ability to swap out lenses, and the days of the digital video camera were numbered. This is of course not the case, and certain aspects of DSLR technology have moved backwards into video cameras to make them technologically better – just even more expensive. At the very top of the scale is the RED – the RED actually has a sensor which is equivalent (or even smaller) than a 5D, but works differently (see later).
The other main reason for a DSLR is workflow. We even had ex-RED camera users in the audience last night who were dumping their RED digital cameras to start shooting with DSLR instead. The reasons for this were not to do with the camera as such, but the sheer scale of crew which needs to come along with the camera equipment for even the most basic shots. DSLRs on the other hand, can get into the smallest of spaces, with a greater range of accessories to provide a better job.
Side note: For the same reasons, when Robert Rodriguez remade El Mariachi, the first thing that he did to the professional crew was sack two-thirds of them, blowing the automatic Hollywood ethos out of the water.
David (both a pioneer in DSLRs, but also one of the first people to use a RED underwater, regardless of what people are saying about Cameron) stated in the first few minutes of the session that a DSLR will provide a better experience for more than 80% of the film making workflow. The last 20% can make all of the difference (again see comments later), but are we really all making movies for a 70mm screen?
Why is a DSLR different from a DSLR
OK, apparently weird title, but it really comes down to the use of DSLR in cinematography as opposed to photography.
At the end of the day, there can be no arguing that a DSLR was never designed for film-making. The ability of DSLRs to create some excellent films is purely a side-effect of a number of technological advances in this medium which only later were applied retrospectively to video-cameras themselves.
The differences really extend from the following points (not exhaustive):
Sensor vs. Resolution The large sensor in a DSLR allows for the capturing of very good exposures through the lens. Unfortunately, these sensors are geared up to capture images at very high resolutions intended for stills photography – such as 24M in the case of my Sony. What this means is that a lot of this data must be discarded for use in video. Modern, high quality cameras such as the RED use the same sensors, but are designed to capture the resolution natively – they therefore record as much data as they actually capture, with no discarding.
Examples of DSLR sensor sizes. The left-hand sensors were typical of those in video cameras before DSLR technology was retrospectively adopted.
Heat DSLRs are able to record continually, but in doing so they start to build up heat – a lot of it generated from the digital display and CPU. This is not a problem for stills photography as such, as a single image is recorded and written periodically. A tip is to not buy large recording media for video recording – several good 8Gb SDHC card for example is a good option rather than a single 32Gb card as it forces you to remove a hot card and replace it with a new, cool card. Similarly, replace the battery at every opportunity for the same reasons. In these two tips we are not concerned with them heating up, but using the new items as heat sinks. DSLRs will shutdown if they get too hot (as with most electronic safety systems), but there is an additional issue with film quality – leave it on too long, quality of recording also starts to suffer due to the heat effects on the sensor. When not filming (e.g. during lighting setup, discussion of scene changes etc.), turn the camera off.
Focus While auto-focus can not be used when filming (this is not 100% correct, as the Sony Alphas are the first camera with auto-focus which can work while recording due to their translucent mirror technology), turn it off anyway and preferably buy superior ‘primary’ lenses with very long throw (how far you need to turn the focus ring for a small change in focus) or alternately a bolt-on geared focus dial. You can spend a long time focusing for a single stills shot, but don’t have that option when filming.
Shutter-speed, focal length etc. It’s easy to forget that you are a film maker and treat the calculation of focal lengths and shutter speeds like a typical DSLR user (i.e. stills photographer). Turn everything automatic off, and learn to use a single, standard setup which matches traditional cinematography – e.g. fix yourself at 24 or 25fps at 1/50th, at ISO320 etc. and don’t play with it in real time – you can of course break the rules whenever you want for the sake of storytelling, but this type of setup gives a standard ‘cinema / film’ appearance. The important point: don’t treat the camera like a stills camera.
While you may want to buy a good stills camera as well as a DSLR for film-making, it is very important to realise that the important features of the two worlds are often at odds – many of the major selling points of a good many DSLRs go straight out of the window as they are totally irrelevant when looking at the camera from a film-making perspective.
In the case of my Sony SLT-A65 for example, why would I want to spend an extra £500 for an extra 4fps multi-shot shooting, a few more focus points and an aluminium body in the SLT-A77 when they are never going to be used in my film-making? In the case of the difference of the Canon 5D and 7D, which are pretty much on a par in film-making, the difference is even worse – double the cost from some vendors.
DSLRs and Sound
DSLR cameras often come in for a lot of criticism in regards to the quality of sound that they record. There are two main countering arguments to this.
What do you expect? The first big defence is to ask what is actually expected of a DSLR camera in regards to sound. DSLR cameras are (traditionally at least) really designed as stills camera first, and then video cameras. To ask that they should be able to record film-quality sound is perhaps unfairly asking for one additional step further.
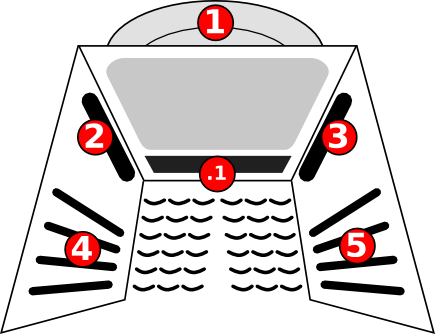
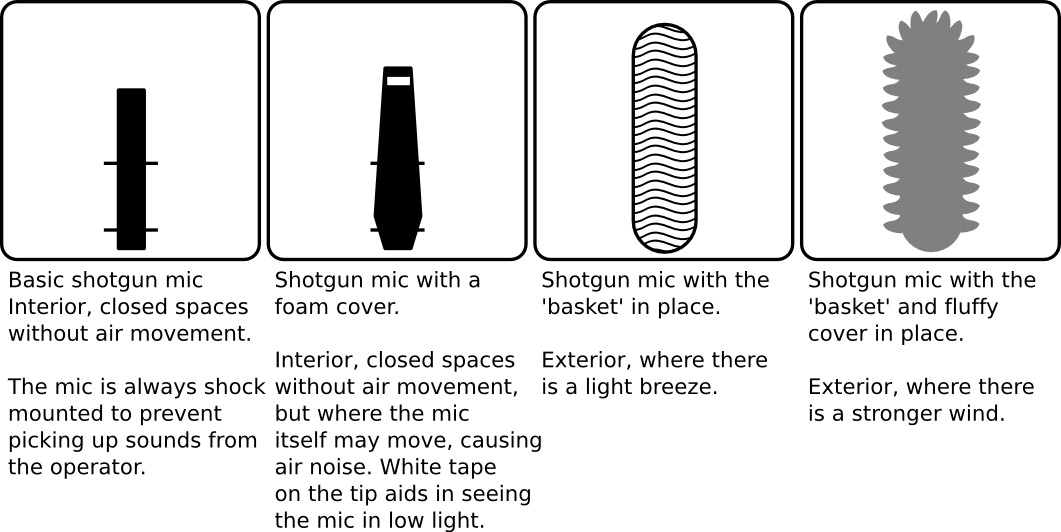
It’s camera dependant Saying that however, it is camera dependant. Some cameras have tiny three-holes in the casing which are simply pretending to be microphones, while others have good quality miniature shotgun mics where previously was only a hot-shoe (and still is). Provision for sound recording, and indeed the quality of sound recording varies greatly.
What is perhaps true to say, is that DSLR cameras are exactly the same as any other video camera where the microphone is built-in. Quality of microphones vary, and their susceptibility to camera based noise does as well. The reason why current design video cameras are better is simply because while the microphones are still ‘built-in’, they are usually better quality microphones and set in a casing annex away from the body – all of which you are paying for.
It was clear from the session that in regards to sound, DSLR film making should take a leaf from any other professional approaches to film making – and as a result, problematic sound disappears as an issue. Use external pickup devices which feed either to an external recording device, or direct to the camera using the sound-in jacks. A good approach is to actually feed to both (most digital recorders have headphone sockets which can be used as a through-port to the camera) and therefore place a reference track on the video recording, as well as rely on higher quality sound recording for the final edit.
An issue raised by some people was in regards to sound monitoring. The answer to this is also camera dependant: some cameras actually have a headphone out socket (such as my Sony SLT-A65), while others provide this facility (if without fan-fair) using the USB or HDMI sockets. There are plenty of videos on YouTube for example, showing how even to create a USB to Jack adapter so that conventional headphones can be used to monitor the camera sound pickup.
Almost essential additional equipment
Of all of the equipment discussed, three particular items (though one, you could argue is a group) seemed to me as being the most important.
Loupe Although most people will know what a Loupe is from it’s use elsewhere in film, a DSLR loupe has risen from the increase in modern DSLR’s having a separate monitor screen on the back of the camera. It fits over the screen, extending the camera back by many inches and has a soft magnified eye piece which can be used to firmly clamp the camera against the skull. Not only does the perception of what the camera is seeing improve (it’s usually the equivalent of a 50″ screen), but the overall stability of the camera improves as well because of the way it is now being held.
ND filters (and a IR filter as well) I won’t go into the more detailed nuances of ND filters here, but in summary they neutrally reduce the amount of light that is entering the lens. As a result, they improve all sorts of possible image problems and allow the aperture to be opened further to get crisper, cleaner images without the risks of over-exposures (note, that sentence was incredibly summarised). While IR filters are useful in order to prevent blacks becoming magenta (the most common problem with IR being picked up the camera sensor) they are also cheap – having little other effects, they can be left on the camera lens as an insurance policy against scratching and stone-hits.
Primary Lenses While the need for tele-photo / zoom lenses is still important, a good set of primary lenses (i.e. fixed focal-length lenses) seems to be very high on the list of DSLR accessories. While this may seem counter-productive, with most video cameras having their own zoom facilities etc. its importance comes more from their use in making the film-maker stop and think about creativity, generally far better quality as compared to a dynamic lens due to build quality and simplicity, as well as a confirmed more ‘cinematic’ look and feel of the final image.
DSLRs and LEDs and Colour
A few weeks into my membership at the club, I was asked about my experience with LEDs as bad things had been heard about them. As this was a discussion taking place as we were packing away the chairs, my answer was not really detailed. Time to correct this, as it also arose in the session and got a good coverage. LED are quite common with DSLR film making because they are cheap, cool and very light – in other words, you can bolt them onto the side of the DSLR. You can bolt heavier lights on as well, but if you start doing that then you start to reduce the low form-factor attraction of filming using a DSLR in the first place.
All lights have certain issues, and in fact one issue is the same one shared with LEDs, but nobody seems to talk about it with other lighting systems. As the issue is ‘slight’ it is erroneously totally overlooked. This issue is tint. Time to go back to colour theory in lighting again.
Pro-126 LED ‘brick’ for hot-shoe mounting.
When we speak about ‘colour temperature’, what we are really talking about is the ratio of red to blue in the lighting system being used. ‘Tint’ is usually not even a word which enters into the conversation but in reality this is a plain-English term which deals with the missing colour – how much green is in the lighting system being used. In fact, look at the data sheet of any lighting system and you will usually find no discussion on it at all – the industry seems to be caught up in a fixation on red-blue, or colour temperature.
It is important for LEDs however, as so far it has been impossible to produce LEDs without some (read, more than other systems) green light pollution. It’s just a technical / manufacturing issue. The same was true of fluorescent lights as well – as you dial up the internal pressure to trigger the fluorescing, green light increases. The reason why Kino lights are so good is not because they have a particular build quality, but because they solved the problems in regards to making their own, patented fluorescent tubes that are not so susceptible to green-light pollution when the pressure is increased.
The second problem often discussed in regards to LED’s is the generation of ‘harsh light’ – what is really meant by this is sharp-shadows. The reason for this is that LED bulbs are small, intense and highly efficient at creating light (the whole attraction really, as they need little power and keep very cool) – unlike other bulbs which are so imperfect that they ‘leak’ in all directions, and generate more heat than light.
Are either of these a problem? Actually, not in any way at all. You just put a filter in front of the light which corrects the tint and/or diffuses the beam. In fact, modern LED ‘bricks’ usually come with a ‘colour dial’ to completely change the colour of the lights, and a set of filtration covers which diffuse and change the light colour.
Fives ways to light creatively
While the sensors within DSLR cameras (and all digital cinema cameras, really) are improving to the extent that they need less and less light to acquire an image, that is not really an excuse not to light. You still need lots of light if only for the creative process. Five ways were discussed to light a scene, from the point of controls over exposure, along with their creative effects and trade-offs.
Aperture (f / t-stop) Modifying the aperture to let in or restrict the light has a direct trade off in regards to depth of field. It should always be remembered that like many things in cinematography, DoF is usually discussed in the reverse of what it really means. Often regarded as the ‘blur’, or where the ‘blur’ begins, it actually refers to the range of the image which is in focus.
ISO Playing with the ISO, or equivalent when discussing digital cameras as it of course originally referred to the speed of physical film, has a direct influence over the amount of grain (or noise) in the image. With DSLR cinematography, it was recommended only to use 160, 320 or 640 and nothing outside this range – though 1250 was occasionally acceptable in extreme situations. So there is another major difference between stills and video. Modifying the ISO may be required within this range, but actually has the least creative impact on the story-telling. One special note in regards to Canon cameras, is that these ISO values are the ‘natural’ values of the camera as a result of technical reasons – setting the camera to 100 for example, gives exactly the same results as 160. While ISO100 and ISO160 are different in reality, the actual ISO value in use is digitally modified by the camera. This must be a very Canon specific issue however (perhaps others), as my Sony Alpha has the photography-typical ISO settings of 100, 200, 400 etc. and does not seem to perform the same modifications.
Light Light is the obvious aspect which a film maker has total control over (when using artificial light, anyway) and therefore has the greatest and most all-encompassing creative impact on all aspects of the final image.
Shutter speed The shutter speed has a curiously interesting influence over the story-telling. David / Evie recommended that a natural value to use for DSLRs is 1/50 as it hits a good balance between crispness (faster shutter speed) and capturing a continuously exposed image (lower shutter speeds, as may be required in low-light photography). The issue here however, is not a technical one but the way in which our brain understands the meaning of the final image produced.The more blur introduced into the image gives the impression of a reduction in speed of thought, though this is something that is probably less likely to be introduced other than in certain fantasy / SF films which imply that the protagonist is moving at a faster rate. 1/50th is therefore a natural pace which balances crispness of image against motion-blur which not only gives a cinematic appearance (it is the equivalent of the 180′ film shutter, which Hollywood has taught the world is the ‘norm’ for the last 90 years or so) but a better sense of overall movement. Faster shutter speeds give a clear, crisp image with staccato movement between frames and are used in such things as the opening sequence of Saving Private Ryan and Gladiator – this simulates the way in which humans see the world after having an jolt of adrenalin and gives the audience a better key as to the underlying story pace. David referred to it as ‘car crash cinematography’.
Gladiator (Dreamworks, 2000): The Germanic and arena combat sequences were filmed with fast shutter speeds to create crisp images.
ND (neutral density) The use of neutral density filters was seen as the holy-grail of controlling levels of light and exposure – simply because it has no creative influence whatsoever. Neutral Density filters can therefore be used to modify the light levels without any modification of the creative appearance desired by the film maker.
Pros & Cons of DSLR
Take some of these pros and cons with a pinch of salt: some are camera dependant, while others need only a very small modification to work flow to totally negate any effects.
Pros
A very large sensor size – very large in comparison to the majority of pro/consumer dedicated video cameras on the market today. Even the RED Epic equals the a typical DSLR sensor size.
Low Light – They give the option of operating in very low light levels and produce excellent results. A good DSLR video can reflect the quality of a dedicated fashion shoot, but actually moving.
Form Factor (and accompanying accessories) – they are small enough to fit into places where other cameras can’t access.
Cheap – actually, far cheaper than you would expect as other than some build issues connected with use in a professional environment, a 5D and a 7D are very similar when it comes down to cinematography over still photography. David himself stated that if he needed to buy again and did not have certain professional needs, he’d probably go for two 7D’s instead of a single 5D.
Lenses – Lenses are interchangeable, and are changed (even interchangeable-lens video camera lenses are actually rarely removed from the camera). They make you think about what is the best option to get the creative appearance being sought for the story.
Stabalisation Most people have problems with stabilisation during film-making with DSLRs because they approach them as a stills camera (which we’ve already said, don’t). Because of their light-weight form factor however, as well as tripods, there are a vast array of ‘DSLR Rigs’ available, both commercially and instructions for making home-made versions. Many tripods are not advised (use a proper film-making tripod, not a stills, despite their low weight), but also mono-pods (regarding them as an additional aid to manual stabilisation).
Smaller Crew With a DSLR you automatically need fewer crew and less (or at least, far lighter) equipment. The one negative of this, is that you sometimes need better crew as filming a professional production with smaller crew often means that you have lost some of the dedicated specialised knowledge along the way.
Cons
Sound – a typical DSLR (which is not designed with the same video priorities) usually has a bad microphone (the three-small-holes type on most Canons).
Auto-volume controls – again a Canon specific issue which needs the chip to be ‘hacked’ to enable a feature which Canon did not enable, allowing the system to be turned off.
Use of 3.5mm sound jacks – not a huge issue as the XLR standard’s third pin really only carries the balance signal. Record to an external device and/or keep cable lengths short and away from power lines – problems solved by the balance signal are not generated in the microphone.
Aliasing – caused by the way in which the compressed image is written to disk when downsizing the image to HD resolutions. There is a good way and a bad way of doing this, and the Canons discussed at present don’t seem to have as good a codec as other manufacturers – they essentially just throw away everything but every fourth line. This will increase generally once faster and better processors become generally available for use in cameras.
Moire – a knock-on from the aliasing scenario, where patterns of aliased image start to make a moire pattern. This can also happen even on film, but DSLRs are just a little more prone to it.
Compression – a more general issue, but starts to have its effect felt further when talking about large areas of similar colour. Green-screen backgrounds for example, start to be made up of large blocks of colour and give checker-board effects in post when replacing them. It is also for this reason that it is vital to change the colour temperature of the camera to the appropriate level for the environment in which you are filming – the colour temperature’s effect on how the compression takes place can cause issues later in editing. This is not an issue when shooting RAW (i.e. still photography).
Rolling Shutter – move an object too fast for the shutter, and they start to appear in frame at strange angles or as multiple-occurences. It is a little bit of a controversial subject, but with cheaper DSLRs especially don’t pan (this was said tongue-in-cheek, as this actually applies to all video cameras and is especially prevalent in some situations, such as filming from car windows).
Looking through the cons list I felt that most of these were actually true of nearly every digital video camera I’ve every owned to be honest, so I did not really seem many of these are real cons compared to a typical amateur club camera – David of course, is looking at these from the point of view of comparing a typical DSLR against film and high-quality cameras like the RED Epic.
6 ways to go 3D without the glasses
There are six creative ways of increasing the depth of your image without taking the step to film in 3D. The first step is to accept the fact that the only place ‘3D’ actually exists is in the human brain – a three dimensional image as we know it is the brain assembling images in a particular way and them understanding them in a particular way. If we can give the human brain additional clues in a 2D image as how elements of it are meant to exist in 3D space, the human brain will do the rest of the work.
DoF The ubiquitous depth of field is of course the first and most obvious step. Speak to many professionals about DoF and they will cringe – not because of what it is as such, but because how much overkill it sees. Used correctly however, and in moderation, and it works beautifully.
Perspective Rather than photograph someone against a wall, go to one side and photograph the subject and the wall receding into the distance. Add perspective to the shot, and the brain will catch on very quickly that there is meant to be depth to the scene.
Parallax The term ‘parallax’ has been heavily used in SF, but also has it’s own real-world counterpart. It essentially refers to how objects move in relation to each other based upon the observers perspective. Look at three objects in perfect alignment, then move your head from side to side. The front object moves left or right in vision extremely quickly, the second maybe a little, while the most distant maybe not at all – this is the parallax effect.
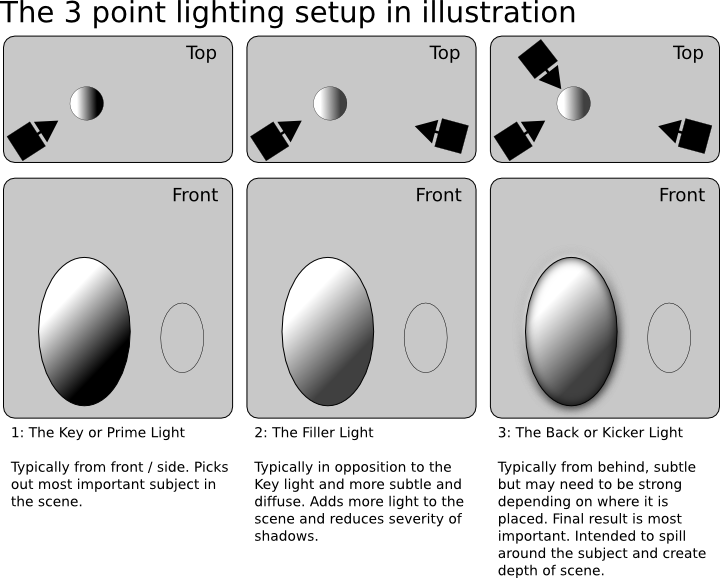
Back Light An essential element of the 3pt lighting setup and already discussed in one of my previous Raindance articles. Add a backlight to the subject’s lighting requirements, and it will detach it/him/her from the flat background.
Foreground Objects A great deal of film is produced with the camera keeping the subject as the first object (in regards to distance) in the frame – it is a typical aspect of classic / traditional Hollywood where the product (i.e. the lead actor) was seen to be paramount. Ironically, this flattens the image. Instead, film the subject with another object, perhaps only partially visible and extremely blurred due to the effects of DoF, and an additional layer is added to the picture. The subject is now set in a 3D world, rather that the topic of a flat page in a book.
Haze Haze was described as the ‘rich man’s depth of field’ – it has similar effects, but is the result of totally different physical properties / causes. DoF usually manifests itself as a blurring of any objects outside a narrow field of focus. It therefore modifies the physical appearance. Haze on the other hand, and other similar conditions such as water and atmospheric turbidity (which I use a great deal for this purpose in CG), modifies the density of the media between the camera and the subject – while colour and contrast changes, the ‘crispness’ of the image changes to a far lesser degree. It can be far more effective than DoF as it is this type of image that the eye expects to see in real-life.
In order to improve the depth of an image, you do not need to use all six of these together – usually two or three go a long way to giving the brain all of the hints it needs to fill in the rest of the picture.
A final tip
The final tip of the evening, which I place here because it does not quite fit anywhere else, is appropriate for anyone who is currently filming digital and has the ability to modify their contrast, brightness etc. levels for recording.
This trick involves dialling back the colour of the recording image somewhat so that the blacks are not quite so black, white not quite so white etc. with the aim of gathering far more colour information – the contents of the flares and shadows are actually visible in the image, rather than being totally washed out. While the quote, ‘we’ll fix it in post’ is a terrible one and usually costs a fortune, this is a deliberate action which gives a wide range of additional flexibility to doing something with the additional image information gathered. While the shadows can be blacked out, as is often the case on the initial recordings, alternately there are plenty of other image manipulations and colour gradings which could be performed instead.
For Canon users, Technicolor have recently developed the ‘perfect’ setup of this nature duplicating their own colour grading processes, and placed it onto their website, free of charge.
Conclusion of the evening
In regards to ‘absorbing the waves’ (to paraphrase Donald Sutherland in Kelly’s Heroes), this is one of the better evenings I’ve been to – mainly because of the attitude and approach subconsciously given to the audience by a pair of young film-makers who are relatively new (i.e. they’ve not yet been in the industry for decades) and yet are still experts in cutting edge digital film-making. Added to this the interaction between the two in class which was classic directory / DoP carrying out camera demonstrations etc. (they are actually man and wife), and the evening was a perfect ‘film’ get together.
A short time ago, Chris called on members of the club to try and film more drama. I thought therefore, that I’d put together some of the essentials that go into coming up with a story and writing it for production based upon my own experiences. While I’ve not had anything filmed professionally, I’ve always written for enjoyment purposes and have something like twenty-five years of scripts, novels and entire RPG environments sitting in my files at home.
While I’m not going to claim screen-writing divinity (let’s face it, very few people other than myself have even read my scripts), I was pleasantly surprised by the fact that my techniques were supported and reinforced by legends and tutors like Elliot Grove and Syd Field when attending their courses and visiting lectures, and my submissions of ‘homework’ were praised.
What I have not done in this article is delve into the deeper aspects of character development and such like – that’s for another article. This one is just about the story as a whole.
Types of document
You can probably get away with an idea scribbled on the back of a cigarette packet, but lets be honest: when an industry starts to use standard documents, formulated and improved over decades, there is usually a reason. They help planning, understanding and ultimately, quality of the final production.
There are essentially three types of document (not production) that you may write – these may be named differently in different countries, but their underlying content is consistent:
An Idea
The idea can be as short as a single line, or an entire document containing facts and figures and intended purely to remind you about the fleeting, elusive and easily forgotten thought. For these, it helps if you carry a dedicated notepad around with you. This is the type of thing that you write down at 2:30am after eating too much cheese and pickled-onions.
A Treatment
The treatment is a first step in putting together a concise explanation of the idea and what you would intend to happen in the production. It has no waffle and tends to be from three to seven (an extremely long one) pages in length, stating very clearly what happens without details. It is usually designed to have impact, so exclamation marks and other attention grabbers are common. This is the type of document that you would give to a studio executive who intends to read your own and two-thousand others on the same day.
A Script
The script is where you bring it all together and expand on the actual happenings that take place in your treatment. Here, you ‘slow down’ and spell it all out in visual description of events (not details, you are not writing a novel) and all of the dialogue. An script formatted to industry standards equates to about one minute of screen time per page. You do not include instructions to actors (even parenthesis, which are accepted in some schools of thought, tend to be blocked out by actors before reading the script) or the cameraman*.
* Take these last two with a pinch of salt for our environment. In the amateur and independent world, you may be the actor, DoP, director and producer so you may actually have jumped straight to a shooting script for your own benefit right from word go.
It should be noted that this does not include the various type of script that you may write, each of which has a different purpose for different types of film crew in actually planning for the final production (e.g. script, shooting script, sound script etc.)
For writing, I’d advise looking at a dedicated script writing tool rather than a word processor. I have used Word, Open Office and Pages in the past (this latter actually has a dedicated ‘script’ template, so it was very good), but at the end of the day a dedicated tool is a dedicated tool. They tend to offer lots of value added advantages over a more generic product. To get started, I’d always advise Celtx (pronounced Kell-Tex – it’s a accronym for Crew, Equipment, Location and XML) as it is desktop, mobile and web based, but most importantly, free.
Story and Plot
At a technical level there is a huge gulf between the idea of ‘story’ and ‘plot’ and yet these are two words which incorrectly get used interchangeably. When a cinema-goer comes out of a disappointing film and claims that the director ‘lost the plot’, what they usually mean is that they lost the story – the fact that the film started, had a middle and then ended with a conclusion means that the plot was actually [probably] OK.
Plot
The plot is the easy bit – this is essentially the actual words that you write down in your script including visual events, sounds that are heard, dialogue that is spoken etc. This is also the bit which utilises the traditional concept that you even learn in school: it must have a beginning, a middle and an end. Unless you are going really art-house, pretty much every film will have an understandable plot. The plot must also however, be the carriage for the…
Story
The story can be far more elusive – the story is what the film is really about, not just what is happening on screen. Using a comic metaphor, the story is ‘boy meets girl, boy loses girl, girl meets someone else, boy temporarily wins girl back before sacrificing himself for girl’s happiness with the other boy’ (or, if you a Red Dwarf aficionado, swap out boy with large green blob). There are literally hundreds of films with this same story (er, thousands?): some absolutely abysmal, but also some classics (there is a little known film called Casablanca which comes to mind here). They may all have the same story, but they are all still different because the plot tells the same story in different ways.
Commando (20th Century Fox, 1985): Little story, lots of plot (aka. action): the saviour of Arnold’s career after ‘Red Sonja’.
Just because your film tells a story however, does not mean that it needs to be easy to see. Some elusive stories get the audience returning year after year – they enjoyed the film, they don’t know why they keep going back, but they do: perhaps it is because each time they are getting ever so slightly closer to the truth (“I see something different each time”). I remember Elliot Grove admitting in regards to one film he used in a course example, that it took him fifteen years to eventually see one particular story.
Without trying to be too insulting to certain parts of the world, the final cut of a film often reflects the ability to actually see the story by fee-paying audiences. Films in Europe / the UK can be far deeper than those of the United States for example, where test screenings often get negative results because the audience does not understand the underlying story (e.g. at the last minute, the classic SF film Blade Runner had to be given a Phillip Marlow style VO to explain what was going on because of the reaction of US test audiences – you can’t get a more blatant story-assist than that).
Conversely, action films, while having a simple story (girl is kidnaped, boy invades small country, boy kills everything that moves, boy saves girl) relies almost completely on plot because the story is being worn on its sleeve.
The Four Tools
There are four tools which are used to craft an effective screenplay:
Character
Dialogue (what the characters say)
Actions (of characters etc.)
Settings (the environment, and what environments do)
The screenwriters job is to take a combination of these four tools and stich them together in a seamless manner. Imbalance the stitching (e.g. have a character do or say something inappropriate to the setting) confuses the audience and reduces the effectiveness of the screenplay.
The Four Social Stages
Similarly, there are four social stages in which a story can be set. A warning should be issued here however, as while these four are the generally recognised social stages, what they actually compose of can vary between screenwriters. Some recognise the stage as purely consisting of social interaction (e.g. the social interactions of village life are obviously very different from those of a bustling city), but others also include levels of technology (e.g. a man hunting in the wilderness with a long-bow, would suddenly become City simply because he is carrying a mobile telephone…)
Wilderness
e.g. a man, the only hope, brings a divine revelation to society. A typical ‘superhero’ character story.
Village
e.g. a small environment. One speaker, with social boundaries. The classic hero is an outsider who is considered a threat to everyday life. The hero, after completing the story, usually leaves alone.
City
e.g. a wide range of social classes. The hero tends to be ‘average joe’ who encounters or witnesses an injustice, and who then goes on to fight for justice.
Oppressive City
e.g. often the hero is an anti-hero who likes to go unnoticed. The hero witnesses a crime by a person in power, or is alternately a bumbling and inept hero who stumbles into something he shouldn’t. A city environment, but where things have started to go wrong, possibly before a total social breakdown and loop back to Wilderness.
Wilderness, Village and City (and sometimes ‘Town’, a mix of the two) are reasonably easy to understand. The Oppressive City begins where the city leaves off and some elements of paranoia, untrustworthy officials and conspiracy begins. It could be argued that Chinatown, set in the 1930/40 period is City based, while the use of corrupt city officials means that it is actually Oppressive City.
Chinatown (Paramount, 1974): a period piece, but clearly ‘Oppressive City’.
The social stage may seem irrelevant, but it again comes back to what the characters are doing and saying, and the effects of the environment upon them. Have any of these aspects not meet the defined social stage (without good or explained reasons), and confusion ensues once again. At the same time, mix social stages (e.g. placing one hero into a different social stage) correctly and new stories arise – the key is believability.
The Premise
A standard approach in trying to establish the premise of a story, is to try the ’25 word’ approach (this is not exact, it really just means ‘short’). This dates back to the US TV guide which essentially stated that if you can’t summarise your program in 25 words or less, you would not be included in the TV guide listings.
The basic (loose) format for writing your Premise under these conditions is:
This is a story about [who, or an occupation?] who [what they want to do, the goal] but [the obstacle] – [the final outcome].
For example, if we were try and summarise Casablanca under these conditions, it might go something like this.
This is the story about a bar owner in Casablanca who wants to sit out the war quietly but whose life is turned upside down by a returning old lover hunted by the Nazis – his only thought is to get her to safety.
My view is that this actually says far too much for a TV guide (remember our discussion on story and plot – we are talking about the US here) and gives away a good part of the story, but it is a good jumping off point in the creation of a story. Using this example, we can examine each section of the statement and write up a list of all of the conditions which would need to be in effect for these things to exist or progress.
Casablanca (Warner Bros. 1942): Boy meets girl, boy loses girl…
For example, see how many of these are answered by your previous knowledge of the film, but are questions that you might logically try to answer based upon this short premise:
This bar owner – what’s he like? What is is history? Does he have friends, colleagues, employees?
What is he doing in Casablanca? What brought him here? Is he running from something?
Why does he want to sit out the war quietly? Is he a coward, a deserter, a criminal? Why isn’t he being patriotic?
What prompted the old lover to reappear? Why is she being hunted? Who is she, what is she, what is her history with the hero?
Why does he want to get her to safety if she is a past love? Does he still love her? Is that in fact why he is in Casablanca?
Setting wise, what is it like in Casablanca at this time? Are there any key historical issues to consider? Are there elements of the story which are only plausible (or are implausible) in this setting?
As you can see, it does not take much to get the ball rolling, yet every one of these questions is directly related to a single element of the premise statement.
What came first, the story or the plot?
Almost exclusively in amateur or independent screenwriting, the story comes first. It is the story which the plot is ultimately intending to tell with each of the events that occur to the characters.
There are situations however, where you will have some of the plot, or at least a clear definition of the environment, already established into which you must shoe-horn a story. In these situations, it is usually because you are writing into a defined story environment (e.g. a long running TV show) , or an actual, factual set of historical events (e.g. Blitz and Bananas). Regardless, you need some sort of ‘bible’ – these are detailed documents in the former case, and simple historical fact in the latter.
What do I write?
The big question which really comes down to you. There are two points I’d make about this however:
First, there is no such thing as writers block. It’s all about confidence. Put something down on the page, even if you don’t use any of it in the final piece. The important part is to get a page that has something on it – it will gradually build as you start to think.
Second, don’t be afraid to experiment. You’ll have two dozen ideas before something takes shape that seems feasible – try the final exercise and see what you come up with.
Write about something you know…
Never was a more misleading statement ever made. To quote a Raindance promotional paragraph, “If everyone only wrote about something they knew, we’d be inundated in teenage angst stories…oh, hello Hollywood“.
While the statement is true, you’d be amazed what you actually know. Don’t artificially restrict your boundaries to your immediate experiences (which is the big, misleading result of this statement). Take a look over your past, your skilled knowledge, your hobbies, the skills of your friends and family which you have been peripherally exposed to and expand. It’s amazing how much you do ‘know’ even without needing to do a few months intense research.
Exercise
Get the newspaper, preferably something local with people stories rather than the headline that another European country is about to go bankrupt.
Go through it quickly, page by page, and ring people stories regardless of their importance.
Choose two stories and try to combine them – you can do this by swapping characters, events and locations.
Can you add an additional element which ties the two together, and starts to build a story that you film as a drama?
An example from a course I took used the London Evening Standard. One story was about a business man who was killed by a lorry driver using the hard-shoulder while he was changing a wheel; the other was about a dairy closing down in Dartford. We ultimately came up with this:
This is a story about a recently redundant lorry driver who deliberately runs down his ex-boss at the side of the road but is wracked with personal guilt while the police hunt him – how does he uphold his own morals while caring for his young family?
Links to Craig’s other articles from the Raindance Technical Certificate course :
I’ve never been involved in any formal sound training, and have never really been involved in sound production, so I’m not going to be condescending and say, ‘look what I’ve not been doing’ as I can honestly claim innocence of everything regarding proper sound. But at the same time, taking an abstract and global perspective, the evening turned out to be much as I expected – simply a stunning example of what is overlooked by pretty much everyone who is making a film from home movies, through amateur film clubs to film school students.
Unlike last week, we had quite a few film-club members, professionals and film students in the audience and all of them kept their mouths firmly shut in suggesting things that they believed were true.
I’m not even going to suggest that this article is a true representation of what I learned from this session – there was just so much to cram into a three hour session that we overran by more than half an hour even with Roland Heap, our tutor going at near breakneck speed.
I have a 25 page copy of Roland’s slides, and every one is covered in scribbled notes. I’m only going to heavily summarise the evening here, and in an order which makes sense to the article, not the original presentation, but I would suggest that anyone seriously looking at producing a short film from the club should seriously look at attending this session – it can be taken independently (as with all of the sessions) of the certificate for about £40+vat, and is certainly worth every penny.
Sound in theatres
While Roland was not totally sure of agreeing with the exact numerical value of this statement, someone once said that the film and video experience is actually 50% sound. Indeed, this session is billed with this header. What is certainly true however, is that with a few rare cases, a film is perfectly understandable if you remove the image, but not the other way around.
But first, lets break a myth.
In a theatre, whether 5.1 dolby or even today 7.1, a good 90% of the sound is actually mono, and generated from the single main speaker behind the screen. The reasons for this are simple – put the sound anywhere else and first of all it’s not coming from where you expect it to come from (i.e. the voice of an actor) and secondly depending upon where you are in the theatre a multiple-speaker setup will vary the experience and make it seem unreal. Everything that matters (dialogue, foley etc.) comes from this same single speaker and in mono.
The additional speakers (in 5.1, two either side of screen, and many on either side of the room which collectively represent a single sound source on each wall) are used for additional sound such as music and some sound effects which are used selectively. The final speaker (the .1 in 5.1) is the sub-woofer which generates the ‘vibration’ sound – the one that makes you feel the sound. This speaker is 1/10 of the range of other speakers (hence the term, .1) and is rarely rated above 100hz.
Cinema 5.1 sound – music and FX may use the additional speakers, but nearly all dialogue and foley come from the single mono speaker behind the screen.
The exception to the rule (did we expect anything less?) are the French.
What was clear from Roland’s talk is that sound, far more than film, is regionally dependant. The French, more than all other film making nations, play with movement of sound between stereo speakers a lot.
Sound in TV etc.
The same is not totally true of TV and any shoots which are specifically intended for small-space presentation. This is purely because the distances involved mean that important sound (i.e. dialogue) coming from multiple speakers is not perceivable by the human ear and therefore can not cause confusion (this is of course, unless you watch your TV sideways with one ear pressed against one speaker on the side your set).
In these cases, sound may well be designed to move between speakers to take advantage of home stereo systems.
What is good sound?
One big question that was asked by several of the audience, even as we started, was ‘what is good sound’ – quoting people who have seen productions that they have been involved with as being good or bad sound. While bad sound is usually obvious, the question in some cases was, ‘why can’t I tell that something is good’. Roland’s view was that this is often bogus – there is good sound design (often relating to content), but no real range of ‘good’.
This one to me was perfectly understandable as the same rule is true of my own CGI world.
Good sound is invisible to the experience. Good sound is sound that furthers the story without the audience really understanding that it is there. The only way that you can really perceive good sound, is by not being able to listen to it and say, ‘wow, that’s bad sound’.
Roland made one really important point very quickly in the evening – getting good sound is not difficult to achieve (hire a good sound man, i.e. ME, at BIC2 rates, he then joked). Bad sound is usually the result of breaking certain rules – usually as a result of simply not caring and being content to live in just plain ignorance (my words, not his). Most amateur film makers get hot for a new camera, but few really think about getting good sound.
A good rule stated was that regardless of the budget for your film (excluding huge productions which may have specific budgets for particular things, like CGI, which skew the equation) you should always expect to pay 10% for the sound – this applies all the way to £4 mil films, where you would expect to dedicate £400,000 just for sound production.
A second golden rule is one that sounds obvious.
You’ll all read this and think, yeah, Good Lord, how can anyone be so stupid…but at the same time it is something which Roland admitted is the biggest single failure in sound on amateur and independent films.
What is it?
Simple: Make sure the microphone is actually pointing at what ever it is you want to record.
Pre-Production
Some things to think about in regards to pre-production; things that are not done, but are as important for the sound as they are for the image:
If you are hiring, a good sound man will go for £250 a day, but will work for significantly less is the film is pitched to them properly. This is sometimes very cost effective as sound is very different to other crew: expensive, specialised and often customised equipment is usually owned by the sound crew and will come as part of the deal (e.g. no hire costs). Hire a good sound man, and lots of important planning will be done for you. An important point made however, which is applicable to other crew as well: feed them.
Sound is a very different skill to Music. Everything, from skills to equipment is totally different and there are very few people who can cross back and forth. In fact, the only similarities are the cables that link the microphones to the recorders (side note: Roland is ex-Abbey Road, so if anyone has the authority to make a statement like that, it’s probably him).
Read the script intensely and look for everything connected with sound – either actual production of, or sound from external factors – and plan for it.
Recce everywhere a scene will be recorded (interior and exterior), at the same time and day when filming will take place. Sometimes, problems can be temporally relevant, such as a school run at a certain time of the day, or children in a park during a key duration etc.
For anywhere where there are hard surfaces, plan the availability of sound baffles (e.g. soft furnishings, mattresses, duvets etc.) to absorb sound. Worst places are rooms with hard parallel walls and waterproof surfaces – top of the list for example, bathroom scenes (line one wall, out of sight of the camera, with a big mattress).
Don’t just look for sound issues, look for physical issues as well – low ceilings for example, means that the boom man is going to have issues.
Plan what microphone is best for each shot (this varies hugely, see later). Roland gave one very golden rule which he could not stress enough – don’t buy your good equipment, rent it. An exceptional microphone, can be rented for as little as £5 a day including all of the carrying cases, fittings etc. Only ever buy if absolutely necessary, or it’s very long term use (even renting for a month can come out cheaper). This is particularly true if you need different microphones for different shots.
Production (i.e. Recording the sound)
There are some golden rules when it comes to actually recording the sound, and there are lots of other tips that go along with them. The important part is that if you break any of these rules, or are otherwise lax about them, your final sound will suffer.
Make sure that the microphone is pointed at the subject making the sound at any moment. This is where an experienced boom operator comes in – not just in ensuring that the microphone (particular important if it’s a very tight directional shotgun mic in use) is pointed at the mouth of the actor (not the forehead, or chest…) but that he knows how the dialogue switches from person to person (i.e. he’s actually read the script).
There is no such thing as too many microphones on the set – it just adds to the complexity of the final mixing but at the same time greatly enhancing the options available.
Unless you are deliberately using VO (voice over), avoid ADR (additional dialogue recording) like the plague and record everything from the set, location etc., especially at amateur and independent levels. While you may not have experienced actors to repeat dialogue effectively off set etc., the biggest problem is cost. Additionally, ADR can actually ruin a previously good performance. Conversely, some US productions only use ADR, re-recording everything and using very little from the location recordings.
If you must record ADR, especially if you are using it for VO, do so in a 100% sound-dead room. For amateur film-making for example, line the walls of the smallest room in your house with mattresses and duvets and record in there.
When recording, try to record dialogue as best as is feasibly possible, and drop everything else out (a final recording like this, as used in demonstration during the session sounds very, very strange). There is more on why a little later, but one simple fact in play here is that you can add any sounds that you want to a recording, but it’s nigh on impossible to remove them – the killer being any form of reverb (i.e. reverberation, a more complicated version of echo). If you have any reverb on your recording, you may as well record it all again.
Other extremely bad sounds that you certainly do not want to record (but add later in post) include music, waterfalls and traffic. In the case of music (and other similar noise, like crowd scenes and car-alarms) they represent continuity nightmares. In the case of things like waterfalls and traffic, these are very broad spectrum sounds that are impossible to identify using sound filters – it is therefore impossible to get rid of them. An additional problem with traffic, and other similar sounds, is that they are period dependant – 2012 traffic sounds totally different to 1940s traffic, which is totally different to 1900s traffic etc. In “The King’s Speech” they had to line the exterior walls of their buildings with sound-dampeners to prevent this type of modern noise reaching the location shooting.
Any slight problem that you hear but decide is acceptable under the circumstances will sound 10 to 100 times worse when it’s recorded – kill as many extraneous sounds as possible, and especially electrical hums. The human brain makes lots of allowances, coupled with the fact the microphones record (at a technical level) in a very different manner to the human ear.
Record wild sounds (a wild recording is background sound of a set or location) everywhere, and in different situations (e.g. record 60 seconds of empty room, another with the birds chirping outside, background crowd scenes if in a pub etc.). Not only do you use these to bridge sound cuts (there is always some sound going on, even if you are only aware of it subconsciously), but it also allows you to use foley (see later) recorded at the scene and is therefore more natural. Avoid sound libraries as much as possible.
Record wild sounds of any continuity breaking audio, such as traffic / traffic events (no matter how minor). Once a scene is cut, a low volume copy of this specific wild track can be placed into the scene which hides the impact of the cuts (most important, if the continuity problem is volume or intensity related).
Record mono for pretty much everything – there is next to no benefit in recording stereo for any sounds other than atmospheric wild tracks (see above), which are also sometimes done in surround sound if the final production / presentation method will take advantage of it.
Post-Production
There were lots of sound crew jobs discussed, most importantly stating what they actually do and how the job is important to the post-production assembly of the sound. I’m going to totally ignore this, as to be honest it is all redundant for our OVFM environment where a single individual will probably be doing everything. As a result, here’s another bullet point list:
While the final edit might be a single image track and several sound tracks (e.g. dialogue will professionally be placed onto a separate track so that it can be replaced for international markets), this totally hides what really happens in production. The example that we had (a 3min long police siege / raid scene from a film called “Jack Falls’s”) started with 4 sound tracks in the first edit, rising to 192 tracks during sound design (of which only about five were dialogue tracks), falling to 4 tracks in the final mix.
A sounding editing screen shot – the demonstration footage in the session included 192 separate sound tracks.
Each track is a very minor piece of the overall sound track of the film – while each track might be recorded at full volume, it is modified to fit the scene and required stresses. Crowds for example are recorded separately and added across the final edits of the dialog to flatten the sound-scape. In every episode of Eastenders for example, the background characters in the pub are actually near to miming so that the dialogue of the focus characters remain the only voices being recorded.
Many of the sound tracks that will be added to a scene during sound design will be so quiet that the listener will not hear them in the final film and are present for sub-concious perception. They will however, hear them not being present.
In feature films, almost everything that you hear on screen (other than dialogue) was created in the Foley room (Foley is the act of re-creating sounds using other devices to replace the real sound onscreen, including sound FX – named after Jack Foley, who oddly enough, also created the ‘CC in a TV’ close-captioning logo). In demonstration, we watched a sequence of the latest Robin Hood film in parallel to the sound engineers in the sound room – nothing in the three minute sequence was real sound, recorded on the set – everything from horse foot-steps (the obvious traditional one), to man walking on grass (how subtle is that?) to the quiet squeak of the leather jerkin as Russell Crowe turns around to face the camera.
Most NLE (non-linear editors) are insufficient to do justice (editing wise) to a sound track (both Adobe and Final Cut fall into these categories). The simple fact is, they are designed for video editing (let’s face it, that’s what is written on the box), and a sound editor is always the best approach. In many ways, my opening lines of this article are born out by this – the software that we are using to put together our films are re-enforcing the lack of thought when it comes to sound.
Dont make the final sound track too low in volume. Record initially at a good recording level (lowering intensity is not a problem, but boosting the intensity also boosts all of the imperfections, especially things like electronic hums), and don’t lower it too much in post. A big mistake of visually oriented film makers is subduing the sound generally – subdue only when it will enhance, especially prior to loud events like gun-shots and explosions, or to build tension.
Equipment
The basic equipment list which might be utilised by a sound engineer (or you) breaks down to:
Boom microphones
Radio microphones
Wind and shock isolation mounts
Boom poles and stands
Mixers
Recorders
Foldback (essentially, earphones but in specific use by the sound crew)
One of (if not the only in practice) concern in regards to selecting a microphone is the polar pattern – the shape of the area covered by any particular microphone. In other words, where will the microphone pick up sound best, moderately, and least. There are five basic patterns, but which can be summarised in three groups:
Omni Directional
The omni-directional microphone picks up sound equally from all around it. From a film-making point of view, it is almost totally useless unless hidden in the middle of a group of actors. It’s main use is in the collection of wild-tracks and atmospherics.
Figure of 8
The figure of 8 picks up sound best from directly in front and behind (some are oriented deliberately to get the sides and no front/back). This microphone is also of little use unless hidden between two actors.
Cardiod
The cardiod range of microphones is of most use – it is named because the shape of the pick-up area is a little like a ‘heart’. Most good sound is picked up from straight ahead, a little less to front-sides, sides and rear-sides, with little directly behind (note: because of a technical issue, there is a small ‘bubble’ of high sound pickup directly behind the microphone which is usually not shown on diagrams).This is the standard type usually referred to as ‘shotgun’ microphones. Hyper-cardiods (e.g. Schoeps CMC-641) have a broad forward bubble of reception, and smaller to the rear. Super-cardiods (e.g. Sennheiser 416 etc.) push the bubble further and longer to the front, with a gradual decrease of the area behind. These tend to be very directional, and are perfect as boom-microphones pointed directly at the actors mouth as they will pick up next to no ambient sounds from elsewhere.
Contrary to what might be considered common sense, very directional microphones such as the (some) hyper- and all super-cardiods (which prevent extraneous sound being picked up) should be avoided in interior locations. A technical effect of their pick-up mechanism means that they are worse at amplifying reverberation and extraneous noise in confined spaces (i.e. interior shoots) and should really be restricted to location. For interiors, use a more general cardiod of hyper-cardiod microphone, such as the Schoeps.
Quality of microphones really pans out in the resistance to RF interference and to a certain extent, build quality. If up close (e.g. a boom mic a few inches from the face) low priced microphones are more than comparable to higher priced manufacturers. However, as the mic pulls back such as when the boom needs to be further away for a wider camera angle, quality starts to suffer – quality microphones record quality sound for longer distances.
Radio Microphones are best used only where a boom microphone is impractical (e.g. long shots, very confined spaces). They are a nightmare to hide and are very susceptible to other sounds. As Roland put it – actors are not good microphone mounts – they rub, generate their own internal noises and don’t like their personal parts prodded (male and female) in the attempt to hide the microphones and transmitters. Additionally, radio microphones, because of where they are placed / hidden give flat or confusing sound – the ‘ear’ is in a different place to where it would naturally be (like the boom mic, out in front of where the actor is speaking). This can be corrected in post, but only by an expert and it is expensive.
A word of warning – right now, DO NOT BUY A SECOND HAND radio microphone. The upcoming 4G WiFi systems cover Channel 69, which previously was used by radio-microphones. Most older equipment can not be upgraded to use the new Channel 38, so the only safe way of get a working (and legal) radio microphone is to buy new. Roland himself estimates that he has about £15,000 worth of equipment which is about to become worthless.
Mixers are used to fine-tune recording levels, but not much else unless, as with Roland recently, he had a scene using 4 booms and 10 radio mic all working together – and even then, they are normally recorded to different tracks for use in the editing suite. At the level of amateur film making, they are not really much use, especially as today they are often built in to recording equipment.
Mixers come into their own in the sound-studio itself (e.g. see the Foley video above), but again are really beyond what we as amateurs and independents will probably ever need unless we are hiring sound engineer services – the facilities provided by our video or sound editing software is probably more than sufficient to make up the difference.
Recorders are used to record sound. Obvious, right? But there is a big difference in how they accomplish this, the quality of their connectivity (i.e the jacks etc.), and a lot of the ‘quality’ and ‘feel’ of their sound recording is subjective. It often comes down to tape (e.g. the Nagra) or digital (such as the Zoom H4N, quite a common digital recording device in our environment). Also in this category are the video camera themselves, capable of direct audio input to the recording medium – as sound tracks and image tracks can be split in the editing suite and re-written to disk, this is a very convenient way of ensuring that the sound is always in sync.
For separate recording, a simple hand-clap on camera is more than sufficient to trigger a spike that can be tracked for sound synchronisation. The use of a clapper board (which essentially does the same purpose) in modern times is often used for cinematography purposes to display a much wider range of information useful to the general editing process – many modern electronic clapperboards are even totally silent.
Hire
While most of us at out level of club film making don’t really need to hire, if we are making our masterpiece and really want good quality sound then hiring is the way to go, don’t buy (or even bringing in a sound-engineer who will have his/her own equipment in the first place). As a general guide, these are typical prices (all in, with all the mounts etc.) that you can expect to currently pay on a daily basis:
£9 – Boom microphone (Sennheiser 416 etc.)
£24 – Radio microphone (Audio ltd. 2020)
£3 – Boom pole
£20 – Mixer (Sound Devices 442)
£45 – Recorder (Sound Devices 744T – quite a beast)
Conclusions from the evening
I think I said it all in my opening lines – this was an incredible evening simply in the gradual reveal of the range of things to think about in regards to recording sound. While a good many things were ‘obvious’ even if they still are not done in practice, it was the minor things that really made the information about sound recording all the more valuable.
Coming from a CG background however, where the laying of a vast array of different layers is a natural event however, I was most influenced by the sound design phases – looking at Roland’s laptop and seeing dozens (er, hundreds – he actually had the Jack Fall’s project running live on the MacBook) was something I could relate to and which confirmed my ideas of how it should work were I’ve always thought I must be over complicating it.
This is definitely a session for people to attend who want to produce great sound.
Next Session
The next session is DSLR – my camera of choice in video production. Already looking forward to it.
I’ve been a member since late last year, but that’s not a lot of time in a club that meets only bi-monthly for people to really know who I am, so here goes – about the author.
Despite first writing software in assembly language and being involved in computer graphics, both at a semi-professional level since very young I never chose to enter into these as a career. After seeing various forms of government service however, which did ultimately involve both at key levels I decided to form my own companies. Today, I still run software development, digital graphics and digital publishing companies at the same time as being lecturer up to degree level computing in Mid-Kent. From next year, I’ll also be involved in the HE Digital Media program.
I did this however, without any qualifications in these fields so in 2004 after more than thirty years in the industries (amazing what happens between eye-blinks…) I
went back to school by starting an HNC at Mid-Kent College in computing and an Access to Arts course at the University of Creative Arts. Today I teach that same computing course, hold a BSc in Computing, am a Chartered IT Professional, a PGCE (i.e. I’m qualified to teach), am in the last few months of an MA in Digital Design, and gearing up for a Doctorate in Digital Design / Digital Media in the next academic year.
So what has all of this to do with this article?
While I’ve not done much with my graphics company for years (too much work elsewhere), I covered a lot of corporate work and too many fan films to want to remember them, as well as a vast amount of CG work of a different nature that was never intended to appear on film. I decided to get back into the film world via OVFM and learning new / updating my non-CG film making knowledge by joining Raindance.
I completed my Scriptwriting Certificate with them in November last year, and started my Technical Certificate this Thursday with the aim of converting each set into their Diploma level qualifications (you can take these up-front, but I don’t have time). I’ll be taking as many of their courses as I can shoe-horn into my schedule in readiness for the Doctorate next year.
Who Are Raindance?
Some of you will be well aware of who Raindance are, some of you will know Raindance from a particular perspective, while some of you will never have heard of Raindance at all. If you want to know the nitty-gritty details, take a look at their website at www.Raindance.org, but here is a summary.
Raindance was started in 1992 by Elliot Grove, an extremely knowledgable and experienced industry professional, in order to greatly expand and improve film making in the UK (though he’s a Canadian by birth). Raindance organise the Independent Film Festival, the Independent Film Trust, as well as running the British Independent Film Awards (BIFA). It is supported by film industry professionals ranging from Chris Nolan to Mike Figgis.
What some people perhaps do not know is that Raindance, as part of their commitment to improving film production provide a wide range of film-making services as well as having a massive training commitment which has expanded from the UK to include Toronto, Montreal, Vancouver, Mumbai, New York, Budapest, Berlin and Brussels. These are the courses taken by and delivered by some of the most influential British film makers in the industry today.
Chris Nolan stored his equipment in a spare space in the Raindance offices while filming his first film in and around Soho as a student with them, while Guy Ritchie hammered out the details of the ‘Lock-Stock’ script with Elliot during his film-making course. So far I’ve attended courses directed by Elliot, Chris Thomas and the legendary Syd Field.
Today, Raindance even run a flexible, tailored MA program in film making consisting of their courses, validation by University, and resulting in the production of a film as the final project.
While I may go back and retrospectively tell of my experiences and pass on tips from the Scriptwriting Course if people are interested, this short set of articles is about the Technical Certificate. Over the next five weeks, I’ll be passing on experiences ranging from lighting (last night, the first session) to weeks dedicated to sound, DSLR film making, editing, and finally SFX.
The Power of Lighting
The first session covered the power of lighting – an interesting proposal in the Craven Street rehearsal rooms off Charing Cross as they consist of small, sub-basement cubes of white-washed walls, probably the last place that a tutor wants in the instruction of lighting techniques.
The environment consisted of a wide array of lighting types ranging from Red-Heads and Blondes, to Dedo, Kino lamps and LED arrays. A wide range of clips were also on show to demonstrate exactly how setups, concepts and genre lighting styles (e.g. Film Noir) had actually been utilised on film as they cropped up in discussion.
The big question to start off with however, was ‘why light?’ (as in the noun, not substance). That may sound like a no-brainer, but it’s actually a more complex topic today than it was years ago. In the past, film cameras needed vast amounts of light from incredibly powerful beams just to get anything appearing on the film at all. Bright natural light after all, is the whole reason why Hollywood even exists.
Today, modern video cameras need very little light to do the same job – the Ewan MacGregor / Christopher Plummer film ‘Beginners’ (for which he won an Oscar) for example, was filmed on a RED camera with no lighting setup at all – it was all done with whatever natural (i.e. non-contrived) light sources were available.
Five reasons raised their head:
Illumination (the obvious one),
to create mood and atmosphere,
the focusing of attention,
the creation of depth in what is essentially a 2D media form
and the enhancement of the directors vision in what is actually a highly collaborative art form (i.e the director states his vision, the DoP/L and lighting engineers arrange it, if feasible).
Other than the first, what all of the others ultimately refined as was ‘to tell the story’. If you are experienced enough and know why you are doing it, every rule in the book can be broken in order to further the story that you are trying to tell. An example of this was the final death scene in ‘The Assassination of Jesse James…’, where every camera angle switch breaks continuity so as to tell the story – the story telling is so successful, that the lighting continuity breaches are overlooked.
The Assassination of Jesse James by the coward Robert Ford (Warner Bros. 2007) – A scene which breaks lighting continuity on every camera angle, but still works to build tension.
As a side, Mike Figgis in his book on Digital Filmmaking goes into this as well – breaking down the need to even consider traditional lighting setups.
Naturally, I don’t want to simply repeat the entire session here, but here are some of things that the session raises and has you thinking about:
With your lighting, how much camera movement can you get (for storytelling purposes) with the same setup? This is not so much about avoiding re-lighting for a different camera angle, but more about the realities of the scene e.g. a hotel room with supposedly inflexible lighting sources, avoiding the placement of red-heads that magically generate light from what should be a solid-wall.
Always look not just at the lighting, but how much shadow you are generating as well. Sculpting with light is not about light intensity, but the balance between the light and shadow to create the story. A different sculpt will completely change the character of the scene and individual actors. Simply placing a lamp high, middle or low alters the apparent dominance of the character, regardless of the acting.
Colour is the ultimate confuser. Many pros switch their monitors into B&W so that they only see the light intensities. Colour causes the brain to lie about what it is seeing, and some film-makers, even in contemporary stories choose B&W over colour. e.g. ‘The man who wasn’t there’ was actually shot in colour due to a contractual requirement to provide a colour print to certain markets, but it was not the Coen Brothers first choice. A huge amount of experimentation was required to re-print the film correctly into B&W as even different hair colours reflect light differently – a factor which is hidden by the human eye registering the colour instead of the intensity.
Many genre lighting setups are deliberately unnatural and go against what may seem to be common sense and reality. Good examples include Film Noir, which deliberately aims to have most lights (and especially key lights) give hard, crisp shadows.
Lighting types (not equipment) tends to be regarded as falling in four groups: Natural daylight (because it changes); as opposed to Artificial Light (controllable and today essentially consisting of conventional fittings, tungsten, HMI, Fluorescent or LED); whether the light is Hard or Soft; and finally whether the light is Directed, Reflected or Bounced.
The main difference between all light sources (the mixing of light sources is not seen as a problem in itself) is that of colour temperature and therefore the adjustment that needs to be made to return the appearance of white as seen by the camera (i.e. the white balance) back to a human acceptable white for the conditions. In the session, as well as conventional examples, we used a combination of both Tungsten and Daylight lamps (simultaneously) to generate believable setups – setting the white balance in this case was more about deciding what was intended to be the normal time of the day according to the story. A mix of light sources is a normal and believable daily occurrence – having a day lamp giving the impression of a window on one side of the face, while tungsten light gives a different impression on the other is a situation which the human brain actually expects to see and considers normal.
There is still a huge hangup on aperture. Traditionally more of an issue with stills photographers and older cinematographs who are traditionally film camera users, lenses and cameras tend to be favoured with as low an f-stop as possible. While nice for a desired effect (such as the associated depth of field etc.), it’s heavily over used and irrelevant in the modern digital camera world which can perform the same tasks at ever higher f-stop ratings (again, see the ‘Beginners’ example, above). Side note: a film which breaks this mould is Citizen Kane, for which they deliberately designed new wide-angle lenses to have as great a depth of field as possible, but subsequently required vast amounts of light for even the dark film that it is.
Today, light metres are irrelevant and a hang over from film. The change from film to digital is not the important factor here however, but more that it is now possible to see exactly what the camera is seeing without the need to guess using a mathematical model (i.e. a camera version of WYSIWYG), then hope for the best when the film is printed.
The final part of the evening involved experimenting with a traditional 3-point lighting setup but taking it far further than the conventional use – especially with what has already been said here regarding the capabilities of digital camera.
While the important factors of the traditional 3 point setup were discussed (not repeated here, as we’ve already gone though a coaching evening on this very thing in any case), we also went into repeating the same principles to create 4, 5, 6 and more point lighting systems establishing the approaches to increase the storytelling of the background and alternative key features of the scene, as well as improve results and storytelling through the various lens apertures (e.g. lighting for the long lens etc.)
The Social Network (Columbia, 2010) – Extremely rare simultaneous two camera shoot: the key light of one subject acts as the fill and kick light of the other. An very complex lighting setup to design and implement.
Conclusions from the evening
Being principally concerned with the teaching of various software development disciplines, database design and IT management as well as still being firmly established within industry, I sometimes despair at the gulfs between what an industry actually does on an everyday basis and what academia tells a student is important. It came as no surprise last night therefore, that many an arty member of the audience, clearly just out of or still in film school was (unintentionally) shot down by Chris (or Chris, a confusing night as both experts had the same name) by simply replying, ‘nah, not important’.
Books and traditional film classes are fine, but it is very beneficial to see what is really being used, done, or indeed ignored as irrelevant in the current film-industry by a working DoP and Director.
This in itself is important as in amongst the technical awareness of the evening there were a couple of important points which carried throughout everything:
Plan your lighting, and ensure that you have time to plan it, but not in order to follow some technical ‘how its done’ in either setup or the equipment being used. There is no such thing as the ‘best equipment’. Plan it so that it tells the story in the film that you want to make, regardless of how you actually do it.
If you can’t get the lighting right for the film that you want to make, you may not need to change the story but you will need to make a different film. Don’t try to force fit something that simply isn’t going to work for the budget that you have.
The Next Session
The next session will be far more interesting for me as while I greatly enjoyed this session, a lot of the technical aspects are things that I have dealt with before and have even been covered within the OVFM evenings. After all, exactly the same principles in lighting exist in preparing a digital scene as a real one.
The next session however, is a full session dedicated wholly to film quality sound and more importantly, how to use it – something which I have never experienced in a true taught environment.


, the outsider Blender NLE, all work on very similar principles of operation.")

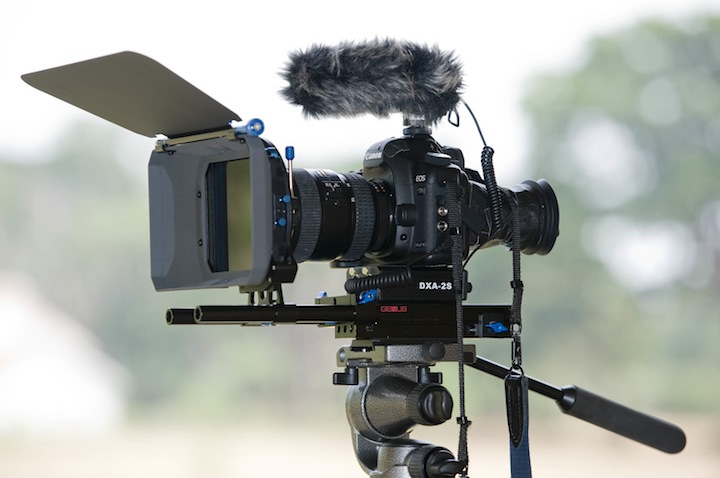
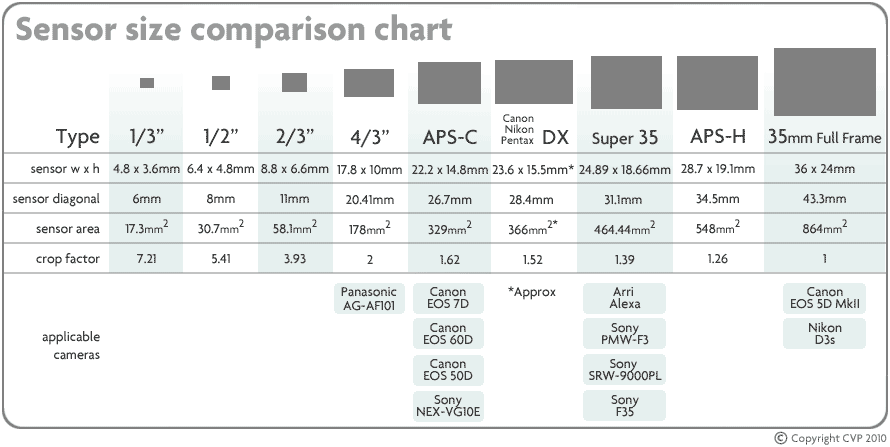

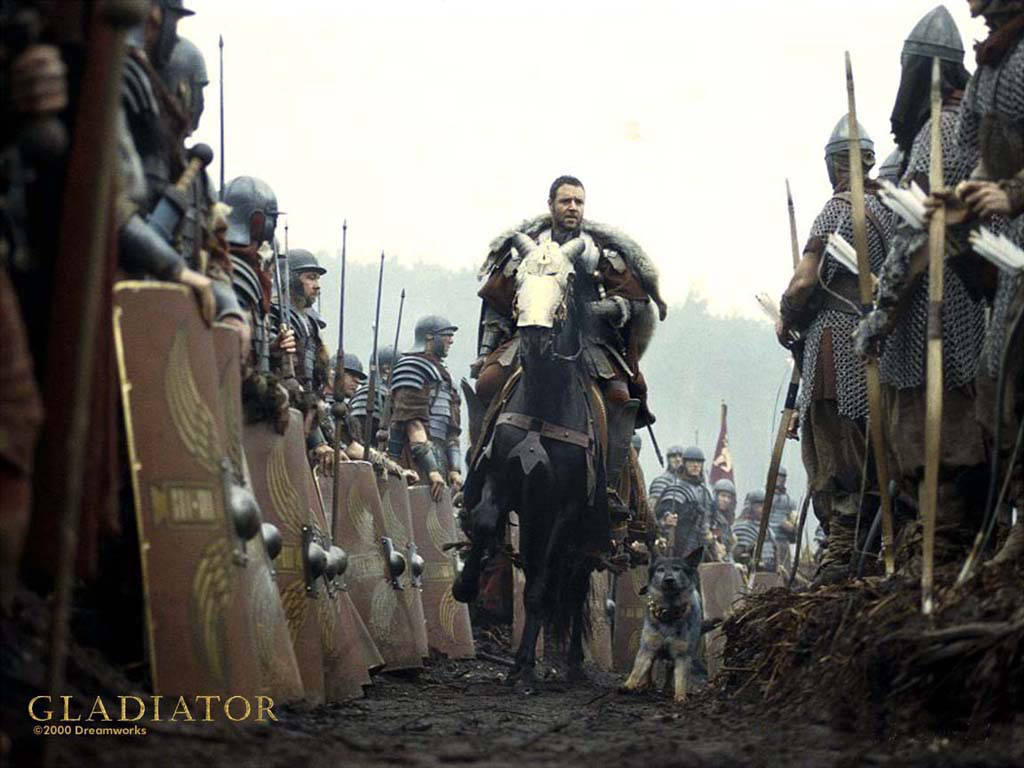

: Little story, lots of plot (aka. action): the saviour of Arnold's career after 'Red Sonja'.")
: a period piece, but clearly 'Oppressive City'.")
: Boy meets girl, boy loses girl...")