![]()
I’m going to stop saying how great each of these evenings was as it’s starting to get repetitive. I’ve never been on a bad Raindance session so far, so I think that we can take it as read (or, is that RED?) that it’s going to be a good one, regardless.
This session, Rory (the course organiser) had to race around at short notice to find a replacement for our planned instructor – as Rory put it, the problem with specifically using people who work in the industry, is that occasionally they actually work in the industry. Our scheduled instructor therefore, was winging his way to Egypt for 5 months of filming.
The replacement however, came in the form of David M. Reynolds and Evie Hazelton, from The Underwater Realm, who oddly enough had just returned from Egypt, working on their underwater project. As well as the session however, I’d also recommend visiting their Underwater Realm website and their vimeo account, where they have some excellent tutorials, as well as their friend Philip Bloom‘s website and blog. If anyone gets movieScope magazine, it’s these guys who are this month’s cover story (Evie herself being the cover image).
I’d also recommend taking a look at this short interview with David regarding their 50min. long feature Zomblies, and taking a look at the film itself – accessible in it’s entirety through the link, to show what can be achieved with a £10,000 budget. Not only does it show what can be done from a cinematography perspective with this type of budget, but also with the SFX / VFX. This discussion on Realm’s Pepsi advert is also a useful watch, especially if you are considering DSLR as a medium.
Before we start, there are many things in this article which are relevant to DSLR’s as well as other digital cameras (e.g. some of the technical / equipment considerations), but also cinematography tips from experienced industry professionals – especially the comments made on lighting and 3D enhancement. Despite this, this article is again not going to do the session justice – there was simply far too much information to even try to write a true representation of everything we learned.
A pinch of salt…
Most of the evening was from the point of view of Canon DSLRs – in particular 5D and 7D variants, the ‘biggies’ in regards to using DSLR cameras for film-making. In fact, David himself while stating use what is best for your own film-making, stated that he would only ever recommend Canon – not so much because of ‘Canon quality’ etc., but mainly because of the commonality of use and therefore the lower cost of additional specialised accessories (though I’ve not had this problem, with a vast array of generics being available).
Many of the criticisms of DSLR cameras in the session however, ranging from physical to image and sound aspects, seem to be issues known to exist with Canon which I myself (with a Sony Alpha camera) don’t seem to have (I should say, I’m not biased – my choice of Sony this time, goes along side a wide range of existing Canon EOS stills camera and equipment still in my inventory).
In that respect therefore, some of the pro’s and con’s, as when discussing all pieces of hardware, are sometimes very specific to the hardware actually in use.
Why a DSLR rather than a video camera?
Two main reasons were discussed as the primary ascendancy triggers of the DSLR in film making. The first is simply cost – I say simply, though it’s more a case of cost for what you get. Up until a certain point, there was no reason to buy a DSLR for film making at all.
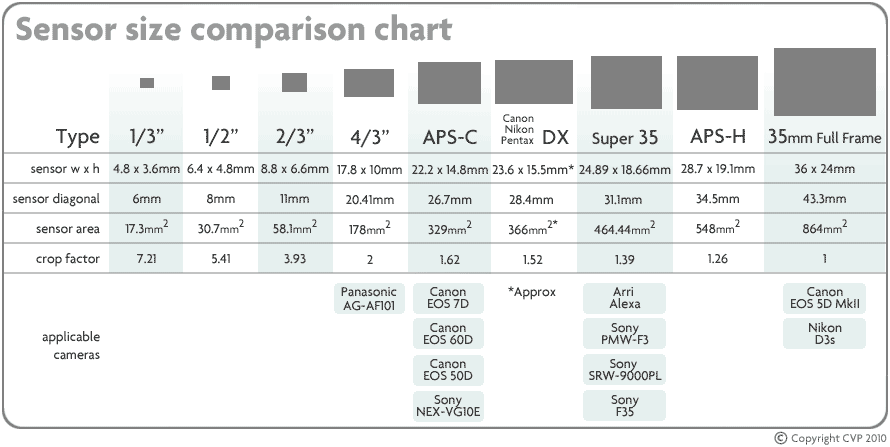
The point at which video camera manufacturers became concerned however, was when the new range of very large sensors entered the market place, giving better image quality and angle for in some cases one-tenth of the cost. Couple this with the other benefits of DSLR cameras, not least of which is the ability to swap out lenses, and the days of the digital video camera were numbered. This is of course not the case, and certain aspects of DSLR technology have moved backwards into video cameras to make them technologically better – just even more expensive. At the very top of the scale is the RED – the RED actually has a sensor which is equivalent (or even smaller) than a 5D, but works differently (see later).
The other main reason for a DSLR is workflow. We even had ex-RED camera users in the audience last night who were dumping their RED digital cameras to start shooting with DSLR instead. The reasons for this were not to do with the camera as such, but the sheer scale of crew which needs to come along with the camera equipment for even the most basic shots. DSLRs on the other hand, can get into the smallest of spaces, with a greater range of accessories to provide a better job.
Side note: For the same reasons, when Robert Rodriguez remade El Mariachi, the first thing that he did to the professional crew was sack two-thirds of them, blowing the automatic Hollywood ethos out of the water.
David (both a pioneer in DSLRs, but also one of the first people to use a RED underwater, regardless of what people are saying about Cameron) stated in the first few minutes of the session that a DSLR will provide a better experience for more than 80% of the film making workflow. The last 20% can make all of the difference (again see comments later), but are we really all making movies for a 70mm screen?
Why is a DSLR different from a DSLR
OK, apparently weird title, but it really comes down to the use of DSLR in cinematography as opposed to photography.
At the end of the day, there can be no arguing that a DSLR was never designed for film-making. The ability of DSLRs to create some excellent films is purely a side-effect of a number of technological advances in this medium which only later were applied retrospectively to video-cameras themselves.
The differences really extend from the following points (not exhaustive):
- Sensor vs. Resolution
The large sensor in a DSLR allows for the capturing of very good exposures through the lens. Unfortunately, these sensors are geared up to capture images at very high resolutions intended for stills photography – such as 24M in the case of my Sony. What this means is that a lot of this data must be discarded for use in video. Modern, high quality cameras such as the RED use the same sensors, but are designed to capture the resolution natively – they therefore record as much data as they actually capture, with no discarding.
- Heat
DSLRs are able to record continually, but in doing so they start to build up heat – a lot of it generated from the digital display and CPU. This is not a problem for stills photography as such, as a single image is recorded and written periodically. A tip is to not buy large recording media for video recording – several good 8Gb SDHC card for example is a good option rather than a single 32Gb card as it forces you to remove a hot card and replace it with a new, cool card. Similarly, replace the battery at every opportunity for the same reasons. In these two tips we are not concerned with them heating up, but using the new items as heat sinks. DSLRs will shutdown if they get too hot (as with most electronic safety systems), but there is an additional issue with film quality – leave it on too long, quality of recording also starts to suffer due to the heat effects on the sensor. When not filming (e.g. during lighting setup, discussion of scene changes etc.), turn the camera off.
- Focus
While auto-focus can not be used when filming (this is not 100% correct, as the Sony Alphas are the first camera with auto-focus which can work while recording due to their translucent mirror technology), turn it off anyway and preferably buy superior ‘primary’ lenses with very long throw (how far you need to turn the focus ring for a small change in focus) or alternately a bolt-on geared focus dial. You can spend a long time focusing for a single stills shot, but don’t have that option when filming.
- Shutter-speed, focal length etc.
It’s easy to forget that you are a film maker and treat the calculation of focal lengths and shutter speeds like a typical DSLR user (i.e. stills photographer). Turn everything automatic off, and learn to use a single, standard setup which matches traditional cinematography – e.g. fix yourself at 24 or 25fps at 1/50th, at ISO320 etc. and don’t play with it in real time – you can of course break the rules whenever you want for the sake of storytelling, but this type of setup gives a standard ‘cinema / film’ appearance. The important point: don’t treat the camera like a stills camera.
While you may want to buy a good stills camera as well as a DSLR for film-making, it is very important to realise that the important features of the two worlds are often at odds – many of the major selling points of a good many DSLRs go straight out of the window as they are totally irrelevant when looking at the camera from a film-making perspective.
In the case of my Sony SLT-A65 for example, why would I want to spend an extra £500 for an extra 4fps multi-shot shooting, a few more focus points and an aluminium body in the SLT-A77 when they are never going to be used in my film-making? In the case of the difference of the Canon 5D and 7D, which are pretty much on a par in film-making, the difference is even worse – double the cost from some vendors.
DSLRs and Sound
DSLR cameras often come in for a lot of criticism in regards to the quality of sound that they record. There are two main countering arguments to this.
- What do you expect?
The first big defence is to ask what is actually expected of a DSLR camera in regards to sound. DSLR cameras are (traditionally at least) really designed as stills camera first, and then video cameras. To ask that they should be able to record film-quality sound is perhaps unfairly asking for one additional step further.
- It’s camera dependant
Saying that however, it is camera dependant. Some cameras have tiny three-holes in the casing which are simply pretending to be microphones, while others have good quality miniature shotgun mics where previously was only a hot-shoe (and still is). Provision for sound recording, and indeed the quality of sound recording varies greatly.
What is perhaps true to say, is that DSLR cameras are exactly the same as any other video camera where the microphone is built-in. Quality of microphones vary, and their susceptibility to camera based noise does as well. The reason why current design video cameras are better is simply because while the microphones are still ‘built-in’, they are usually better quality microphones and set in a casing annex away from the body – all of which you are paying for.
It was clear from the session that in regards to sound, DSLR film making should take a leaf from any other professional approaches to film making – and as a result, problematic sound disappears as an issue. Use external pickup devices which feed either to an external recording device, or direct to the camera using the sound-in jacks. A good approach is to actually feed to both (most digital recorders have headphone sockets which can be used as a through-port to the camera) and therefore place a reference track on the video recording, as well as rely on higher quality sound recording for the final edit.
An issue raised by some people was in regards to sound monitoring. The answer to this is also camera dependant: some cameras actually have a headphone out socket (such as my Sony SLT-A65), while others provide this facility (if without fan-fair) using the USB or HDMI sockets. There are plenty of videos on YouTube for example, showing how even to create a USB to Jack adapter so that conventional headphones can be used to monitor the camera sound pickup.
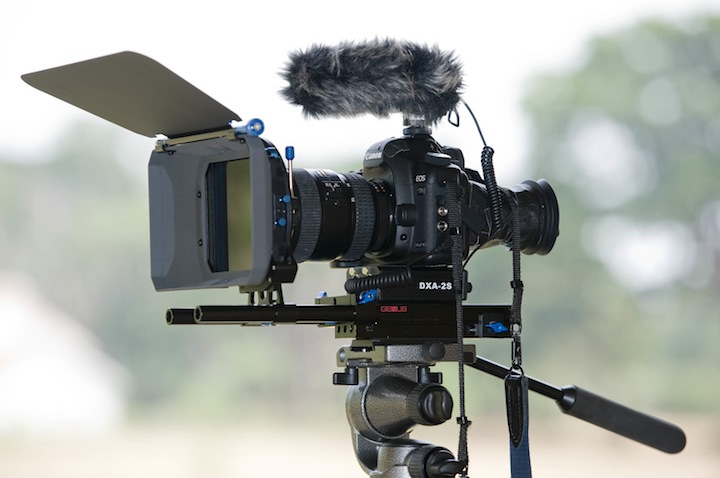
Almost essential additional equipment
Of all of the equipment discussed, three particular items (though one, you could argue is a group) seemed to me as being the most important.
- Loupe
Although most people will know what a Loupe is from it’s use elsewhere in film, a DSLR loupe has risen from the increase in modern DSLR’s having a separate monitor screen on the back of the camera. It fits over the screen, extending the camera back by many inches and has a soft magnified eye piece which can be used to firmly clamp the camera against the skull. Not only does the perception of what the camera is seeing improve (it’s usually the equivalent of a 50″ screen), but the overall stability of the camera improves as well because of the way it is now being held.
- ND filters (and a IR filter as well)
I won’t go into the more detailed nuances of ND filters here, but in summary they neutrally reduce the amount of light that is entering the lens. As a result, they improve all sorts of possible image problems and allow the aperture to be opened further to get crisper, cleaner images without the risks of over-exposures (note, that sentence was incredibly summarised). While IR filters are useful in order to prevent blacks becoming magenta (the most common problem with IR being picked up the camera sensor) they are also cheap – having little other effects, they can be left on the camera lens as an insurance policy against scratching and stone-hits.
- Primary Lenses
While the need for tele-photo / zoom lenses is still important, a good set of primary lenses (i.e. fixed focal-length lenses) seems to be very high on the list of DSLR accessories. While this may seem counter-productive, with most video cameras having their own zoom facilities etc. its importance comes more from their use in making the film-maker stop and think about creativity, generally far better quality as compared to a dynamic lens due to build quality and simplicity, as well as a confirmed more ‘cinematic’ look and feel of the final image.
DSLRs and LEDs and Colour
A few weeks into my membership at the club, I was asked about my experience with LEDs as bad things had been heard about them. As this was a discussion taking place as we were packing away the chairs, my answer was not really detailed. Time to correct this, as it also arose in the session and got a good coverage. LED are quite common with DSLR film making because they are cheap, cool and very light – in other words, you can bolt them onto the side of the DSLR. You can bolt heavier lights on as well, but if you start doing that then you start to reduce the low form-factor attraction of filming using a DSLR in the first place.
All lights have certain issues, and in fact one issue is the same one shared with LEDs, but nobody seems to talk about it with other lighting systems. As the issue is ‘slight’ it is erroneously totally overlooked. This issue is tint. Time to go back to colour theory in lighting again.
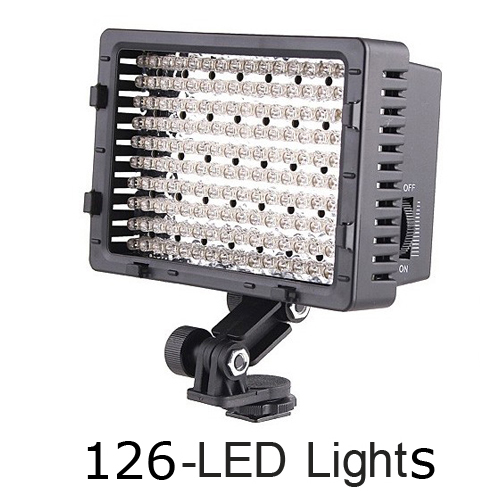
When we speak about ‘colour temperature’, what we are really talking about is the ratio of red to blue in the lighting system being used. ‘Tint’ is usually not even a word which enters into the conversation but in reality this is a plain-English term which deals with the missing colour – how much green is in the lighting system being used. In fact, look at the data sheet of any lighting system and you will usually find no discussion on it at all – the industry seems to be caught up in a fixation on red-blue, or colour temperature.
It is important for LEDs however, as so far it has been impossible to produce LEDs without some (read, more than other systems) green light pollution. It’s just a technical / manufacturing issue. The same was true of fluorescent lights as well – as you dial up the internal pressure to trigger the fluorescing, green light increases. The reason why Kino lights are so good is not because they have a particular build quality, but because they solved the problems in regards to making their own, patented fluorescent tubes that are not so susceptible to green-light pollution when the pressure is increased.
The second problem often discussed in regards to LED’s is the generation of ‘harsh light’ – what is really meant by this is sharp-shadows. The reason for this is that LED bulbs are small, intense and highly efficient at creating light (the whole attraction really, as they need little power and keep very cool) – unlike other bulbs which are so imperfect that they ‘leak’ in all directions, and generate more heat than light.
Are either of these a problem? Actually, not in any way at all. You just put a filter in front of the light which corrects the tint and/or diffuses the beam. In fact, modern LED ‘bricks’ usually come with a ‘colour dial’ to completely change the colour of the lights, and a set of filtration covers which diffuse and change the light colour.
Fives ways to light creatively
While the sensors within DSLR cameras (and all digital cinema cameras, really) are improving to the extent that they need less and less light to acquire an image, that is not really an excuse not to light. You still need lots of light if only for the creative process. Five ways were discussed to light a scene, from the point of controls over exposure, along with their creative effects and trade-offs.
- Aperture (f / t-stop)
Modifying the aperture to let in or restrict the light has a direct trade off in regards to depth of field. It should always be remembered that like many things in cinematography, DoF is usually discussed in the reverse of what it really means. Often regarded as the ‘blur’, or where the ‘blur’ begins, it actually refers to the range of the image which is in focus.
- ISO
Playing with the ISO, or equivalent when discussing digital cameras as it of course originally referred to the speed of physical film, has a direct influence over the amount of grain (or noise) in the image. With DSLR cinematography, it was recommended only to use 160, 320 or 640 and nothing outside this range – though 1250 was occasionally acceptable in extreme situations. So there is another major difference between stills and video. Modifying the ISO may be required within this range, but actually has the least creative impact on the story-telling. One special note in regards to Canon cameras, is that these ISO values are the ‘natural’ values of the camera as a result of technical reasons – setting the camera to 100 for example, gives exactly the same results as 160. While ISO100 and ISO160 are different in reality, the actual ISO value in use is digitally modified by the camera. This must be a very Canon specific issue however (perhaps others), as my Sony Alpha has the photography-typical ISO settings of 100, 200, 400 etc. and does not seem to perform the same modifications.
- Light
Light is the obvious aspect which a film maker has total control over (when using artificial light, anyway) and therefore has the greatest and most all-encompassing creative impact on all aspects of the final image.
- Shutter speed
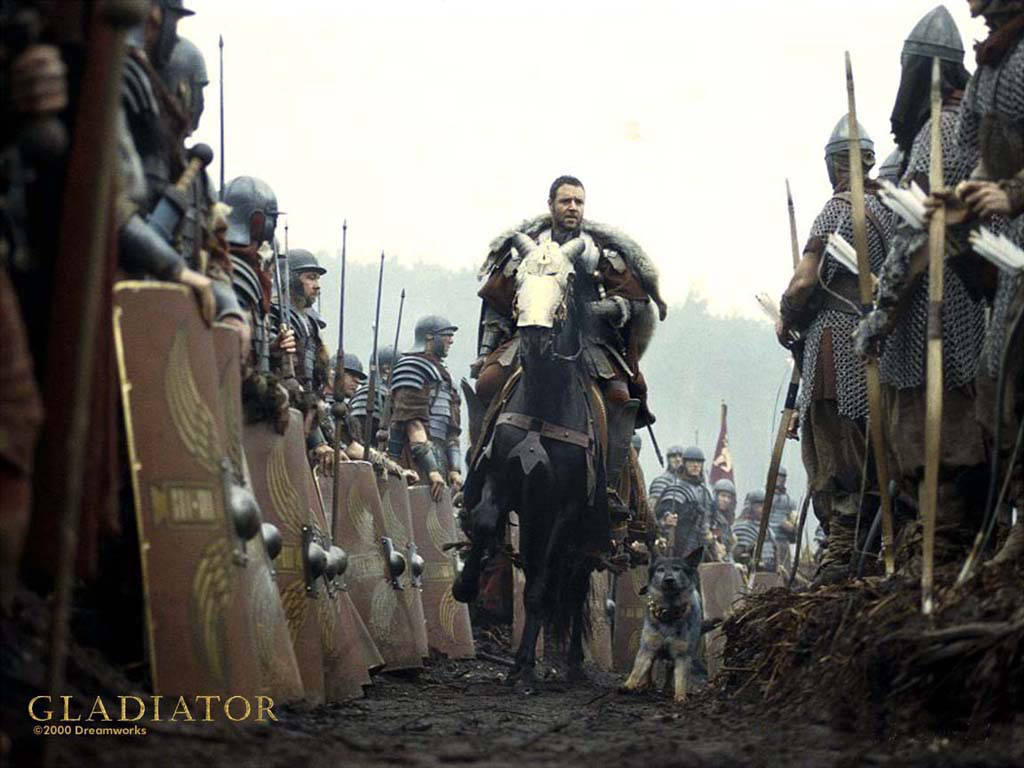
The shutter speed has a curiously interesting influence over the story-telling. David / Evie recommended that a natural value to use for DSLRs is 1/50 as it hits a good balance between crispness (faster shutter speed) and capturing a continuously exposed image (lower shutter speeds, as may be required in low-light photography). The issue here however, is not a technical one but the way in which our brain understands the meaning of the final image produced.The more blur introduced into the image gives the impression of a reduction in speed of thought, though this is something that is probably less likely to be introduced other than in certain fantasy / SF films which imply that the protagonist is moving at a faster rate. 1/50th is therefore a natural pace which balances crispness of image against motion-blur which not only gives a cinematic appearance (it is the equivalent of the 180′ film shutter, which Hollywood has taught the world is the ‘norm’ for the last 90 years or so) but a better sense of overall movement. Faster shutter speeds give a clear, crisp image with staccato movement between frames and are used in such things as the opening sequence of Saving Private Ryan and Gladiator – this simulates the way in which humans see the world after having an jolt of adrenalin and gives the audience a better key as to the underlying story pace. David referred to it as ‘car crash cinematography’.
- ND (neutral density)
The use of neutral density filters was seen as the holy-grail of controlling levels of light and exposure – simply because it has no creative influence whatsoever. Neutral Density filters can therefore be used to modify the light levels without any modification of the creative appearance desired by the film maker.
Pros & Cons of DSLR
Take some of these pros and cons with a pinch of salt: some are camera dependant, while others need only a very small modification to work flow to totally negate any effects.
Pros
- A very large sensor size – very large in comparison to the majority of pro/consumer dedicated video cameras on the market today. Even the RED Epic equals the a typical DSLR sensor size.
- Low Light – They give the option of operating in very low light levels and produce excellent results. A good DSLR video can reflect the quality of a dedicated fashion shoot, but actually moving.
- Form Factor (and accompanying accessories) – they are small enough to fit into places where other cameras can’t access.
- Cheap – actually, far cheaper than you would expect as other than some build issues connected with use in a professional environment, a 5D and a 7D are very similar when it comes down to cinematography over still photography. David himself stated that if he needed to buy again and did not have certain professional needs, he’d probably go for two 7D’s instead of a single 5D.
- Lenses – Lenses are interchangeable, and are changed (even interchangeable-lens video camera lenses are actually rarely removed from the camera). They make you think about what is the best option to get the creative appearance being sought for the story.
- Stabalisation
Most people have problems with stabilisation during film-making with DSLRs because they approach them as a stills camera (which we’ve already said, don’t). Because of their light-weight form factor however, as well as tripods, there are a vast array of ‘DSLR Rigs’ available, both commercially and instructions for making home-made versions. Many tripods are not advised (use a proper film-making tripod, not a stills, despite their low weight), but also mono-pods (regarding them as an additional aid to manual stabilisation).
- Smaller Crew
With a DSLR you automatically need fewer crew and less (or at least, far lighter) equipment. The one negative of this, is that you sometimes need better crew as filming a professional production with smaller crew often means that you have lost some of the dedicated specialised knowledge along the way.
Cons
- Sound – a typical DSLR (which is not designed with the same video priorities) usually has a bad microphone (the three-small-holes type on most Canons).
- Auto-volume controls – again a Canon specific issue which needs the chip to be ‘hacked’ to enable a feature which Canon did not enable, allowing the system to be turned off.
- Use of 3.5mm sound jacks – not a huge issue as the XLR standard’s third pin really only carries the balance signal. Record to an external device and/or keep cable lengths short and away from power lines – problems solved by the balance signal are not generated in the microphone.
- Aliasing – caused by the way in which the compressed image is written to disk when downsizing the image to HD resolutions. There is a good way and a bad way of doing this, and the Canons discussed at present don’t seem to have as good a codec as other manufacturers – they essentially just throw away everything but every fourth line. This will increase generally once faster and better processors become generally available for use in cameras.
- Moire – a knock-on from the aliasing scenario, where patterns of aliased image start to make a moire pattern. This can also happen even on film, but DSLRs are just a little more prone to it.
- Compression – a more general issue, but starts to have its effect felt further when talking about large areas of similar colour. Green-screen backgrounds for example, start to be made up of large blocks of colour and give checker-board effects in post when replacing them. It is also for this reason that it is vital to change the colour temperature of the camera to the appropriate level for the environment in which you are filming – the colour temperature’s effect on how the compression takes place can cause issues later in editing. This is not an issue when shooting RAW (i.e. still photography).
- Rolling Shutter – move an object too fast for the shutter, and they start to appear in frame at strange angles or as multiple-occurences. It is a little bit of a controversial subject, but with cheaper DSLRs especially don’t pan (this was said tongue-in-cheek, as this actually applies to all video cameras and is especially prevalent in some situations, such as filming from car windows).
Looking through the cons list I felt that most of these were actually true of nearly every digital video camera I’ve every owned to be honest, so I did not really seem many of these are real cons compared to a typical amateur club camera – David of course, is looking at these from the point of view of comparing a typical DSLR against film and high-quality cameras like the RED Epic.
6 ways to go 3D without the glasses
There are six creative ways of increasing the depth of your image without taking the step to film in 3D. The first step is to accept the fact that the only place ‘3D’ actually exists is in the human brain – a three dimensional image as we know it is the brain assembling images in a particular way and them understanding them in a particular way. If we can give the human brain additional clues in a 2D image as how elements of it are meant to exist in 3D space, the human brain will do the rest of the work.
- DoF
The ubiquitous depth of field is of course the first and most obvious step. Speak to many professionals about DoF and they will cringe – not because of what it is as such, but because how much overkill it sees. Used correctly however, and in moderation, and it works beautifully.
- Perspective
Rather than photograph someone against a wall, go to one side and photograph the subject and the wall receding into the distance. Add perspective to the shot, and the brain will catch on very quickly that there is meant to be depth to the scene.
- Parallax
The term ‘parallax’ has been heavily used in SF, but also has it’s own real-world counterpart. It essentially refers to how objects move in relation to each other based upon the observers perspective. Look at three objects in perfect alignment, then move your head from side to side. The front object moves left or right in vision extremely quickly, the second maybe a little, while the most distant maybe not at all – this is the parallax effect.
- Back Light
An essential element of the 3pt lighting setup and already discussed in one of my previous Raindance articles. Add a backlight to the subject’s lighting requirements, and it will detach it/him/her from the flat background.
- Foreground Objects
A great deal of film is produced with the camera keeping the subject as the first object (in regards to distance) in the frame – it is a typical aspect of classic / traditional Hollywood where the product (i.e. the lead actor) was seen to be paramount. Ironically, this flattens the image. Instead, film the subject with another object, perhaps only partially visible and extremely blurred due to the effects of DoF, and an additional layer is added to the picture. The subject is now set in a 3D world, rather that the topic of a flat page in a book.
- Haze
Haze was described as the ‘rich man’s depth of field’ – it has similar effects, but is the result of totally different physical properties / causes. DoF usually manifests itself as a blurring of any objects outside a narrow field of focus. It therefore modifies the physical appearance. Haze on the other hand, and other similar conditions such as water and atmospheric turbidity (which I use a great deal for this purpose in CG), modifies the density of the media between the camera and the subject – while colour and contrast changes, the ‘crispness’ of the image changes to a far lesser degree. It can be far more effective than DoF as it is this type of image that the eye expects to see in real-life.
In order to improve the depth of an image, you do not need to use all six of these together – usually two or three go a long way to giving the brain all of the hints it needs to fill in the rest of the picture.
A final tip
The final tip of the evening, which I place here because it does not quite fit anywhere else, is appropriate for anyone who is currently filming digital and has the ability to modify their contrast, brightness etc. levels for recording.
This trick involves dialling back the colour of the recording image somewhat so that the blacks are not quite so black, white not quite so white etc. with the aim of gathering far more colour information – the contents of the flares and shadows are actually visible in the image, rather than being totally washed out. While the quote, ‘we’ll fix it in post’ is a terrible one and usually costs a fortune, this is a deliberate action which gives a wide range of additional flexibility to doing something with the additional image information gathered. While the shadows can be blacked out, as is often the case on the initial recordings, alternately there are plenty of other image manipulations and colour gradings which could be performed instead.
For Canon users, Technicolor have recently developed the ‘perfect’ setup of this nature duplicating their own colour grading processes, and placed it onto their website, free of charge.
Conclusion of the evening
In regards to ‘absorbing the waves’ (to paraphrase Donald Sutherland in Kelly’s Heroes), this is one of the better evenings I’ve been to – mainly because of the attitude and approach subconsciously given to the audience by a pair of young film-makers who are relatively new (i.e. they’ve not yet been in the industry for decades) and yet are still experts in cutting edge digital film-making. Added to this the interaction between the two in class which was classic directory / DoP carrying out camera demonstrations etc. (they are actually man and wife), and the evening was a perfect ‘film’ get together.
3 Replies to “Raindance Technical Certificate 3: The Power of DSLR”
Comments are closed.